
One of the most common questions we receive from former Windows users is how to take a screenshot on a Mac. This can be useful in numerous situations, and we all need to grab a screenshot at one point – to find help for some strange application behaviour, to grab the most hilarious moment of some video, or even to brag about a new high score.
Interestingly enough, knowing how to take a screenshot on a Mac is much easier than on a Windows-powered machine, and yet you have several helpful additions that I am sure you will find useful. We are going to show how easy it is to use this OS X feature, as well as some additional and advanced tips and tricks that can be of great help. So without further ado, let us jump in.
How to take a screenshot of your entire screen?
This short guide will tell you how to take a screenshot of your entire OS X screen, along with the top-positioned menu bar and your Mac’s dock.
- Open all the apps and windows you’d like to include, and place them the way you want them to appear in the final image.
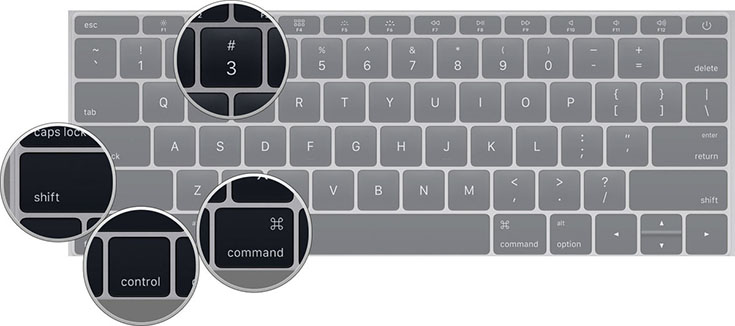
- Press Command + Shift + 3, all at the same time.
- You should hear a camera click sound, notifying you that OS X has taken a screenshot.
- By default, the screenshot will be placed on your desktop in .PNG format, where the file’s name will contain the time and date.
- Double click to open it with Preview, where you can share it.
How to take a screenshot of a custom area of your screen?
Sometimes it won’t be necessary to include the entire screen in a screenshot. For example, maybe you would like to leave some private parts out or something else you don’t want to be seen. Luckily, OS X brings a tool for creating a custom area screenshot.
- Press Command + Shift + F, all the same time, to initiate the screen grabbing feature.
- Position the new crosshair cursor at one corner of the area you’d like to capture, and then click and hold to enclose the wanted area.
- The crosshairs will show a precise pixel count, which can be useful if you want a specific image size, in terms of its resolution. Additionally, you can hold down Option to change the lock point to the centre of the area, or hold down Shift to lock all sides but the one direction you’re currently moving.
- To take the screenshot, simply let go of the mouse button or trackpad.
- You should hear a camera click sound.
- Finally, you can find the screenshot on your desktop in .PNG format, along with the file’s date and time in its name.
HINT: As you can guess, you can always take a full-screen screenshot and edit in OS X’s Preview app, where you can crop and resize it. However, selecting a custom area to take a screenshot is a faster and more direct way, without having to use an image editor.
Taking a screenshot of a specific window of your screen
This is yet another additional way to grab a screenshot, which can be useful when you need to take a screenshot of a specific window, without having the freedom of making it custom sized.
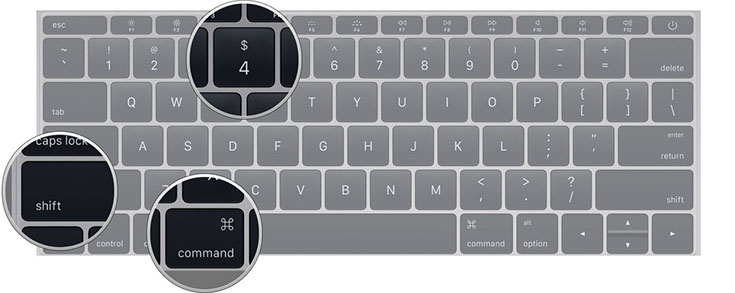
- Press Command + Shift + 4, just like in the previous example. You should see the cursor turn into crosshairs.
- Now press the spacebar, which should turn your cursor into a camera-like symbol.
- Place the camera cursor over a window you’d like to turn into a screenshot. The window should tint blue, so you can sure that OS X recognises the right window prior to taking a screenshot.
- Click on take the screenshot and you should hear a camera click sound.
- Once again, the image will be placed on your desktop in .PNG format.
HINT: This method can be also used to take a screenshot of a drop-down menu, where the only the menu will be captured.
Take a screenshot directly to the OS X Clipboard
This method is useful when you need to take a screenshot without having the image saved to the desktop. This way, the image will be placed in the clipboard, so you can paste it anywhere you want, including Pages and Word documents, e-mail messages, and similar.
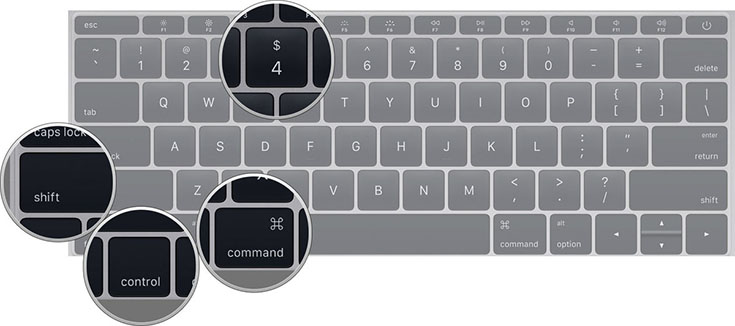
- Press Command + Shift + Control + 3 at the same time, which will take the screenshot of your entire screen to place it in the clipboard.
- Press Command + Shift + Control + 4 at the same time, which will allow you to select an area. If you press Spacebar, this will allow you to screenshot a specific window.
- To paste the image, you can use Control + V or pick Paste from the main menu of an app you’re using.
Edit your screenshots and get them prepared for sharing
On many occasions, taking a screenshot is not going to be sufficient. Sometimes you will need to rotate an image or to annotate something. Even though many OS X users download third-party apps from the Mac App Store, this can be done by using Preview that we all already have on our Macs.
Rotate and Flip: In case you need to rotate or flip an image, you should choose Tools > Rotate Left or Rotate Right. The easier way is to use the Command + R or Command + L to rotate images. Flipping images horizontally or vertically can be done by choosing Tools > Flip Horizontal or Flip Vertical.
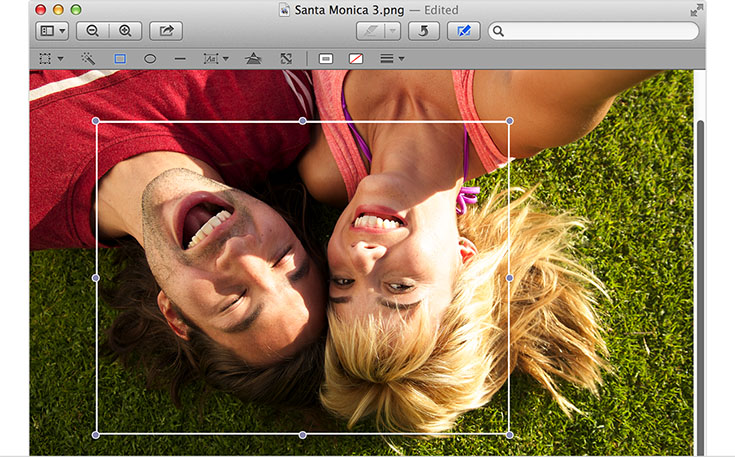
Crop: You can cut out extraneous or private parts of your screenshot by using the Crop tool. By default, the rectangle selection tool is the active option when you open an image (or a screenshot) in Preview. To crop an image, you need to select the portion of the image that you want to keep. Once you make an area, so you can easily readjust it by dragging one of the eight handles. Now choose Tools > Crop to crop the image. You can also use Command + K to do this quicker.
Annotating images: On many occasions, you will want to point something out on your screenshot or maybe to add some text to explain something. This can be done by using the available tools in the Edit toolbar – Rectangle, Oval, Line, Arrow, Text, Speech Bubble, and Thought Bubble. Just select one of these tools you want to draw and drag it over the screenshot. Don’t be afraid if you place the annotation wrong since you can delete it or reposition it by clicking on it and moving it.
Now you know how to take a screenshot on a Mac, and we hope you’re going to use our tips to get the right screenshot. In case you are interested in similar tips and getting the most out of your Mac, feel free to check out our other guides: Top Third-Party OS X Apps You Should Try and 5 Reasons to Get Excited about El Capitan.
