Even though Macs and OS X (or MacOS – as Apple’s operating system is called now) are very intuitive and easy to use, many users are still turning to digital guides and tutorials. Whether you’re a new Mac user of if you’re an experienced user looking to solve some issues – you are in the right place! JustGoodBites brings you an in-depth guide on everything you need to know about setting up a new Mac. We will be talking about some of the following topics:
– How to set up a new Mac;
– How to identify which Mac you have (for diagnostic purposes);
– How to switch from a Windows PC to a Mac;
– Tips and Tricks to get the most of your new computer.
Without further ado, let’s jump to our first segment. We will tell you how to set up a new Mac, which is the best place to start if you’re planning on buying a new OS X-powered machine or in case you already bought one.
How to Set Up a New Mac
It is very easy to get started with a new Mac. Upon the initial launch, you will get to go through several setup steps, ensuring you get the best possible user experience. We will take a look at how to switch on your computer, run through the setup process, as well as how to transfer your files from an old Mac (or from a Windows PC).
Step 1: Starting Your New Mac
You will receive your new computer in a nicely designed box, which is something Apple is known for. Whether you bought a desktop computer or a notebook, you will receive all you need to get started with your Mac in a matter of minutes.
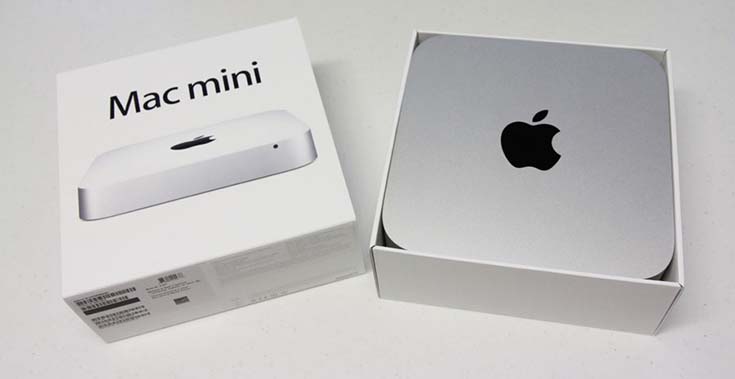
First, unbox your Mac and plug in the power supply. Note that most notebooks carry some charge from when they were tested, which is why you can power them on instantly. If you’ve got a new Mac Mini or a Mac Pro, you will need to attach a monitor, as well as a USB keyboard or mouse. If you’re using wireless peripherals, make sure that you’ve got batteries inside the Apple Magic Trackpad, Magic Mouse, or Apple’s Wireless Keyboard.
Press the Power button and let the magic happen!
Step 2: Setup Assistant
The first time you power your computer on (as well as each time you clean install a new Mac OS version), you will be greeted by a Setup Assistant. This is a program that lets you set up your new Mac, connect to the Internet, and create your own user account. Setup Assistant also lets you review the legal documents and helps you pick the right set of privacy settings. Here’s our step-by-step guide on every single screen the Setup Assistant shows you:
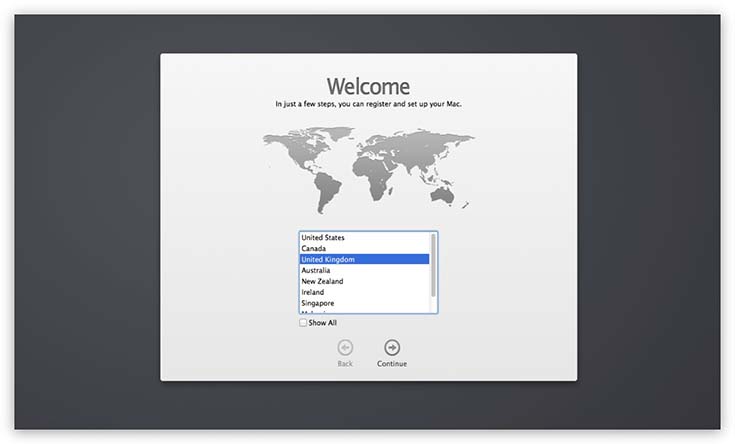
Welcome to your new Mac: The first step displays a Map, where you need to select a country and press Continue. You will also get to select your keyboard input method. This is done by opening the drop-down menu and picking the right entry. Sometimes you will need to click Show All to reveal every single input method (especially if you want to pick more than one).
Connect to the Internet: The next step requires you to connect to the Web. Typically, you will get to pick a Wi-Fi network. Identify your network’s SSID (name) and enter your password. If you’re using an Ethernet connection, you’ll either have to set up your new network or your Mac will recognize all it needs to connect automatically. This depends on your ISP (Internet Service Provider).
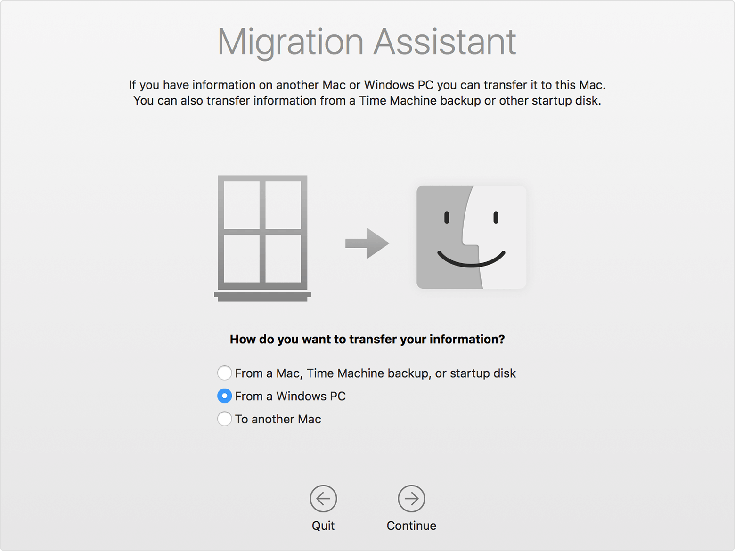
Transfer Information: The Setup Assistant allows you to easily transfer your files if you’re upgrading from an older Mac, where you can use your existing Time Machine backup. Time Machine is Apple’s own backup solution that works great with any MacOS computer. However, many of us are choosing to use some other form of backup, which is where things get a bit complicated. However, it is worth noting that this procedure is run by a program called Migration Assistant. Since there are different ways to get your files to a new Mac, you can click on Not Now and Continue to proceed to the next step. You can run Migration Assistant at any time, so we’ll deal with transferring files a bit later.
Enable Location Services: Apple’s Location Services enable apps to locate your position and retrieve GPS location. Some of Apple’s own services like Maps and Find My Friends use this feature. If you decide to disable this feature, this means that you won’t get to use applications like Maps in its full glory. You should also know that every third-party application will ask for your permission to retrieve certain kinds of information, even if decide to enable Apple to use the Location Services.
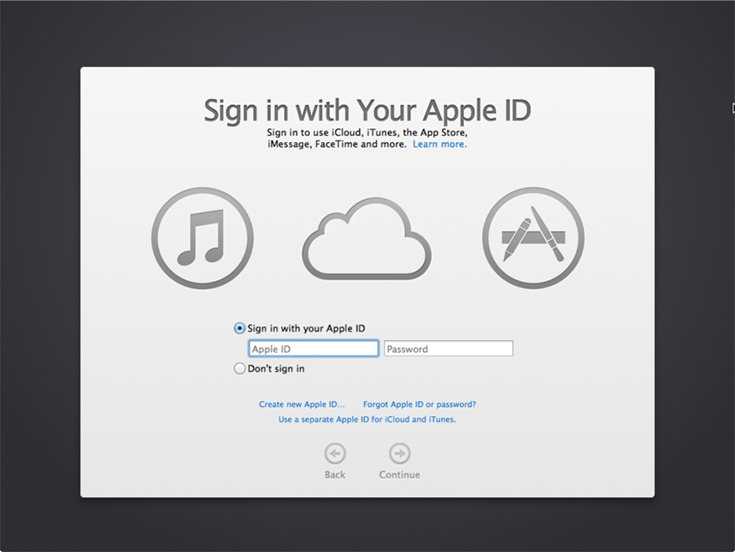
Your credentials: The next step requires you to enter your Apple ID and Password. You probably have one if you already used a Mac or an iOS device. This is the same Apple ID you are using to purchase and download apps from the iOS App Store. The Apple ID is an email address that usually (but not always) ends in “icloud.com”.
In case you don’t have an Apple ID, this is a good time to create one. You will need to sign up using your email address, and you’ll need to provide a credit card information. Using your Apple ID, you can locate missing Macs and iOS devices, use iCloud’s set of services, as well as download (free or paid) applications from the Mac App Store. If you don’t want to create an Apple ID, you can click on Skip. Don’t worry, you can sign up for a new Apple account at any time.
Terms and Conditions: You will be asked to agree to the Terms and Conditions. It is advisable to read this document since it tells how Apple uses your information and how you should use your Mac. However, since this is a fairly long legal document, not many of us actually read it. You’ll have to click Agree two times to continue.
iCloud: This step is used to set up your iCloud account. To do this, you will need to use your Apple ID. Apple’s iCloud is a group of services that syncs your contacts, calendars, mail, web browser information, reminders, notes, and provides 5GB of free online space for other files. This all comes free of charge. We already posted several guides on iCloud, where you can learn all you need to know about this service as well as numerous other clever tips and tricks.
FaceTime and Messages: The next step will ask whether you want to use your email for FaceTime and Messages. If you decide to do so, you will be able to make video calls and send messages (free of charge) to other Mac and iOS users. There is no reason not to take advantage of this great feature, so pick your Apple ID from the list and enable FaceTime/Messages.
Find My Mac: Now you will be asked if you want to use Find My Mac that works thanks to iCloud. As you can assume, this is especially helpful if you are using a notebook computer. Find My Mac displays a map that shows the current location of your computer. This anti-theft feature can be also accessed from iOS devices (using a native app) as well as from the iCloud website. You can even decide to ring an alarm, send a message, or to remotely delete your personal information. We think that Find My Mac is an amazing feature, so make sure you understand how it works and set it up properly.
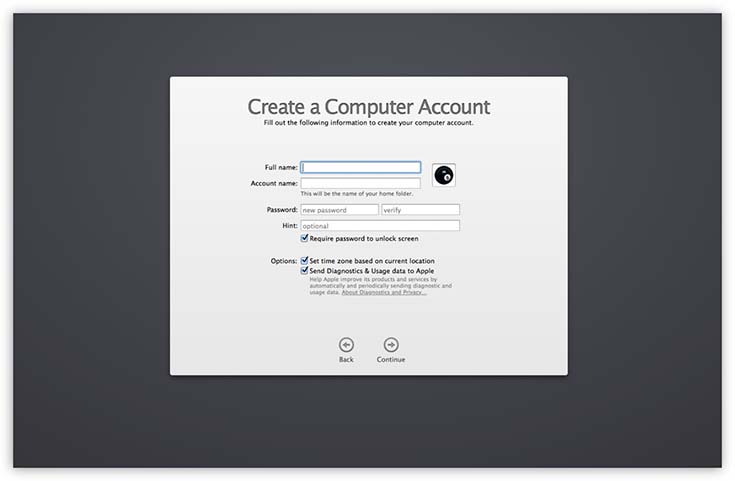
User Accounts: Finally, we come to setting your own user (local) account. You will be required to enter your full name, which will, in turn, create a new account name. Make sure you fill out the Password fields and make sure to remember your new password. You will also see two additional options. The first one says “Allow my Apple ID to reset this user’s password” and “Require a password when logging in”. Both of these are very helpful features, so we believe that you should take advantage of them.
Time Zone: You will also need to manually pick your time zone. However, if you agreed to Location Services, you will see that your time zone is picked automatically. Simply click on Continue and you can rest assured that you Mac will scan your location and change time zones in case you physically change time zones. In case you don’t want to use Location Services, you will be required to change time zones manually.
Diagnostics and Usage: This step was first included with Mac OS Yosemite (10.10). Basically, this is where Apple asks if you are willing to send diagnostic and usage information to the company and third-party app developers. There are two options to choose from: “Send diagnostics & usage data to Apple” and “Share crash data with app developers”. The first option is ticked by default, while you will have to tick the section option manually. It is completely up to you if you want to take advantage of this feature. Know that this doesn’t affect your computer in any way nor you’ll be limited to a user in any way. In fact, this information is used by Apple and developers to help them better understand how you use your Mac and well as if there are any bugs that cause applications to crash.
Register Your Mac: Finally, we come to the last step. This is where you can decide if you’d like to register your machine with Apple. In most cases, you will receive promotional offers and other kinds of marketing emails from Apple if you decide to register your computer. You can just click Skip if you don’t want to do this.
That’s It! The final screen simply says “Thank You”. After clicking Continue, you will be able to start using your Mac.
We would also like to include more step to this setup process. It is advisable to update your computer as well as your applications before starting to use them. You can launch the Mac App Store and click on Updates. This will list all available updates, where you’ll have to click on Update All. In many cases, you will get to see a couple of updates that were released after your Mac left the factory. By going through this final step, you can be sure that you are off to a good start.
How to Identify Which Mac You Have?
In many cases, most of us like to see our Mac’s specifications when we turn it on for the first time. This is good to know since this helps you decide which applications to download/buy and use. In addition, you might be asked about your Mac’s specifications in case of an issue with your new computer.
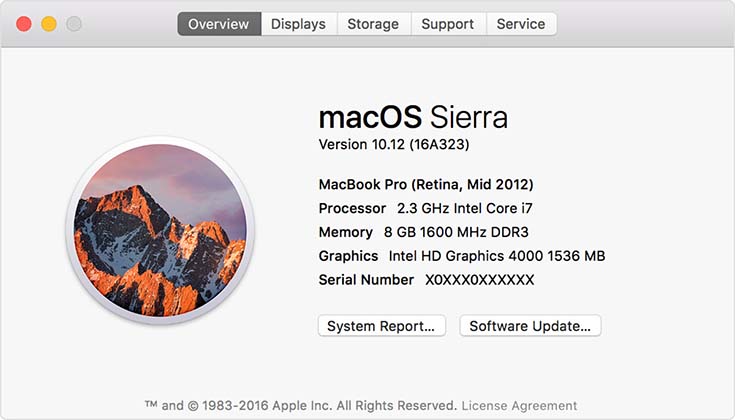
To check out which Mac you have, you first need to click on the Apple logo/button at the top-left corner of your screen. Now click on “About This Mac”. A new window will open, displaying your computer’s model, version, and serial number. To get even more information, you can click on “System Report”. This is where you can check out your Hardware, Network, and Software information.
In certain cases, your Mac might not even be able to start (or boot into Mac OS). This is why it’s important to know where to look for information if you can’t do that digitally. Here is a list of Macs with the locations of the identifier stickers:
– iMac: You can find your iMac’s sticker containing its model number on the base of the computer. Make sure your computer is switched off, disconnect any wires and peripherals, and flip it over. You will see the numbers.
– MacBook Air: The sticker can be found on the back surface of the laptop (in its closed position).
– MacBook Pro: The sticker is located on the back side of the laptop. However, note that for MacBook Pros that were made in 2008 and prior to that year, the location of the numbers if within the laptop. This means that you’ll need to turn off your computer, remove the battery, and locate the number within the battery chamber.
– Mac Mini: Found on the bottom surface of the computer.
Move Your Files to a New Mac
Now, let’s see how to move your existing files to a new Mac. We’ll first explain this for those of you who already use a Mac and want to transfer your files from an older Apple computer.
Before you start, it is recommended to update your software on the both Mac computers (your old and your new one). This will ensure a seamless transition, especially if you manage to install and run the same MacOS version on both of your computers.
In addition, make sure that your old computer has a Computer Name. This is done by going to System Preferences from the Apple menu. Click on Sharing, and then check the Computer Name field.
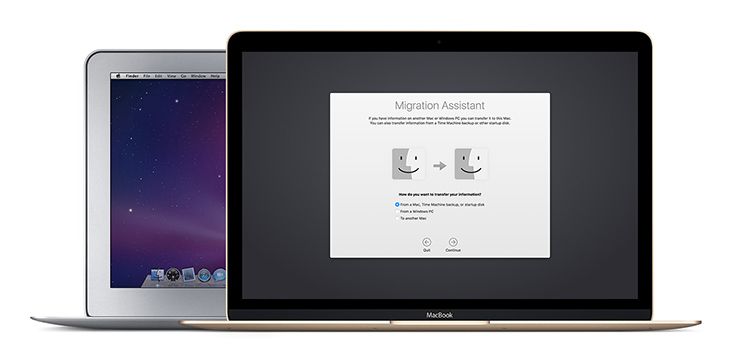
The easiest way is to use Wi-Fi to transfer your files. So, make sure that the both computers are connected to the same Wi-Fi network. Now, open Migration Assistant. It is located in the Utilities folder within your Applications folder. Get to the screen where you have to pick the preferred method of file transfer. You will get to see three options: “From a Mac, Time Machine backup, or startup disk”, “From a Windows PC”, and “To another Mac”. This step should be visible at the same time on both of your Macs. On your old machine, make sure that the “To Another Mac” option is selected. On your new machine, make sure that the “From a Mac, Time Machine backup, or startup disk” is enabled. Click Continue and you should see a security code. If you see a security code on your old Mac, you need to double check that it’s not the same code as on your new Mac.
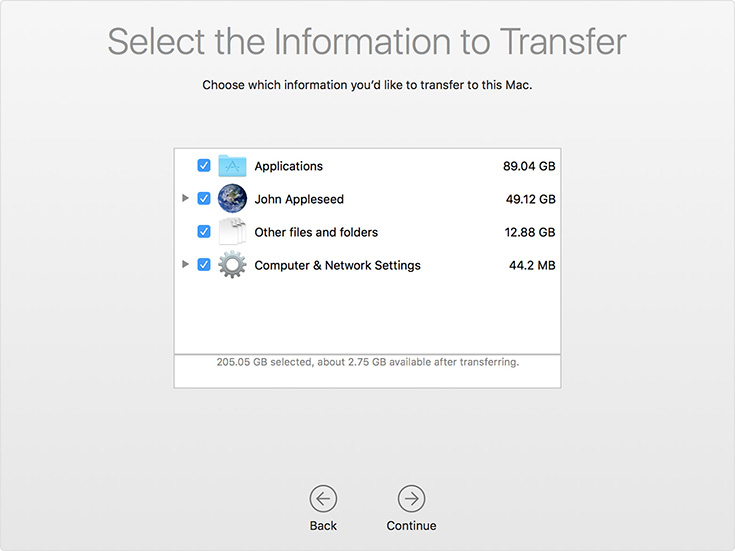
If you are transferring files from a Time Machine backup, you might be asked to enter a password for your encrypted backup. You should see a list of organized backups by date and time. Pick the one you want, and click Continue. Now, you’ll see a list of data that can be transferred. In most cases, these are going to be applications, user created files, computer settings, as well as other kinds of data. After the process is completed, you will need to log into the migrated account on your Mac to see its files.
Move Your Files from Your Windows PC
If you decide to switch from a Windows PC to a new Mac, you can still use the Migration Assistant help you get started. As said before, this tool is being presented the first time you power your computer on, but you can also initiate this process at any time.
The best thing about this tool is that it tries to recognize your Windows PC and your files, and then to store them systematically. It doesn’t just move files blindly to a new Mac. For example, your emails, contacts, and calendars can be moved from Outlook to Mac’s applications like Mail, Contacts, and Calendar. Bookmarks in Internet Explorer (or other browsers) can be migrated to Safari. Even your desktop backgrounds can be moved.

Before launching Migration Assistant, make sure that your PC and your Mac are using the same Wi-Fi network. For the fastest possible transfer, you can use an Ethernet cable. You will also be required to install the Windows Migration Assistant on your PC. Now, run that app on your PC and your Mac at the same time.
During one of the early steps, you should pick two different options on your computers. On your PC, pick the “From a Windows PC” option to mark your Windows PC as the computer that sends the information. On your Mac, you need to pick your new computer as the device that receives the information. This step is followed by another step that displays a set of passcodes. Make sure that the same set of passcodes are present on both of your computers.
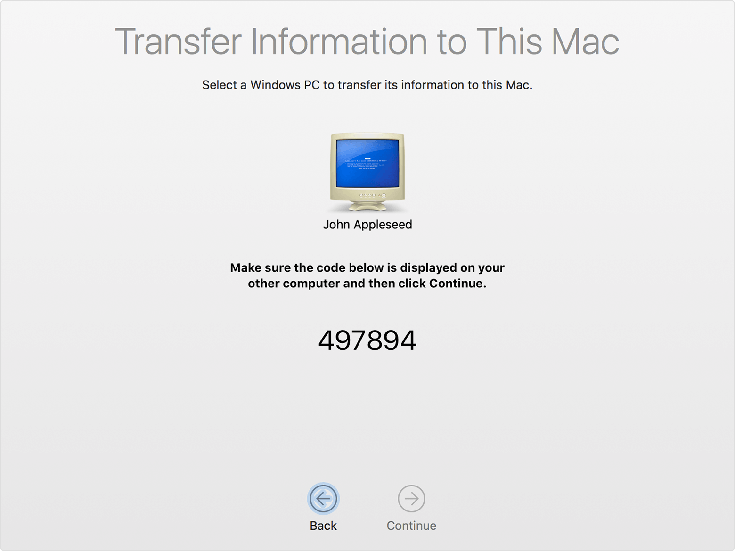
As said before, your Mac will try to recognize different file types and to sort them accordingly. You should see a list of data that can be retrieved. While files are being transferred, you can watch the progress and estimated time remaining on both the Windows PC and your brand new Mac.
After the process is completed, you will need to log into your Mac. That’s it! You should all your files from your old Windows PC on your new Mac.
Consider the Cloud
Aside from using Apple’s Migration Assistant, you can use one of the cloud services to transfer your old files. In many cases, this is more than enough since many of us don’t have highly specialized files that are stored by numerous applications. For other users, this could mean a clean slate. In other words, many of you will find it beneficial to manually move your files and store them on your new Mac.
There is a number of available cloud storage solution that sync files across two or more computers. Some of the most popular ones are Dropbox, Google Drive, and Microsoft OneDrive. In case you already use one of the services, all you need to do is to install its corresponding Mac app. This will automatically download the files you stored in your cloud. Then, you can easily move them to your Mac’s local storage.
The same goes for emails. Most of us use an IMAP server – for example if you are using Gmail or Yahoo Mail. This means that you can delete your Windows mail client without affecting your mail messages. On the other hand, you can set up a new email account within the Mail app on your Mac and continue where you left off.
Tips and Tricks for New Mac Users
Now that you’ve set up your new Mac and after you’ve transferred your personal files, it’s time to take a look at some tips and tricks. We will be taking a look at some of the things that work differently than on a Windows PC. One of the first things is the keyboard.
The Mac Keyboard: If you’ve been a longtime PC user, the first thing you will notice that your Mac’s keyboard works a bit differently. The most obvious command is CMD+C that is used to copy something, instead of CTRL+C that you previously used. Here, we will first answer one of the most common questions that new Mac users typically ask: What and where is the Option key?
In many cases, you will be required to press the Option key for a certain operation/function. Well, you must know that the Option key is labeled Alt on your Mac’s keyboard. It usually sits next to the Ctrl key on the left of the bottom row. Additionally, this key has many uses on a Mac. For example, it is required to select boot partition when starting the computer. You will usually encounter this if you don’t want to boot from your primary drive, or if you have several partitions with different systems on them.
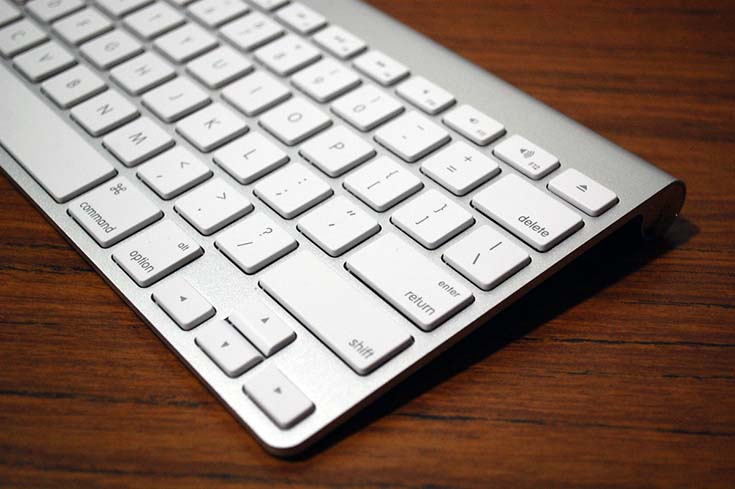
Next, let’s see what is the Apple Key. This is something that even experienced Apple users confuse, but the Apple Key is not the same as the Option Key. The Apple Key is also known as the Command Key and it has the quadruple loop symbol on its physical key. This one is used with a single letter key for many of Mac’s common actions: Apple + S saves in most applications, while Apple + P is used for printing documents. Apple + T opens a new tab in your web browser.
There is also the Control Key (Ctrl), which is a well-known key to Windows users. For Mac users, perhaps the most usable use of this key is for simulating a right-click when using a one-button mouse. Ctrl + Left click does the job.
Installing and Uninstalling Apps: If you’re a Windows user, you will be surprised by how applications are installed and uninstalled on your Mac. In most cases, applications are installed on Mac OS by dragging the downloaded file into the Applications folder. Here’s a step-by-step guide on how to install Mac apps:
– Download the app that you’d like to install and use;
– In most cases, you will end up with a DMG file;
– Double-click to open it;
– You’ll see the mounted image, which will usually open a new window;
– You should see the application’s icon;
– Drag and Drop it onto the Application folder;
– That’s it!
If you are installing some more complex applications like Microsoft’s Office Suite, you will get to go through the familiar installation process. On the other hand, applications that you download from the Mac App Store will be installed automatically, just like on your iOS device.
When it comes to uninstallation, things are very simple. All you have to do is to drag the application from your Applications folder to the Trash Bin. However, certain bits and pieces might be left on your Mac, which is why it’s important to know a couple of different ways to uninstall apps. Lucky for you, JustGoodBites has the perfect guide on everything you need to know.
Defragmentation: You’ll be surprised to know that Macs don’t need to be defragmented. MacOS is built upon the powerful UNIX system and uses the Mac Journaled format. This means that defragmentation happens in the background, without you noticing this process. Additionally, your Mac will usually run a set of scripts and action to improve its performance while it’s idle.
Force Quit: Sometimes you will run a problematic app that freezes your computer. This doesn’t happen often, but it’s still good to know that you can shut down problematic apps. If you come across a problematic app, you can right-click on that application’s icon in the Dock and pick “Force Quit”. You can also use Command + Options + Esc instead of Window’s Ctrl + Alt + Delete. This will bring up a small utility called “Force Quit Application”. Just like the Task Manager, it displays a list of applications that can be quit by force.
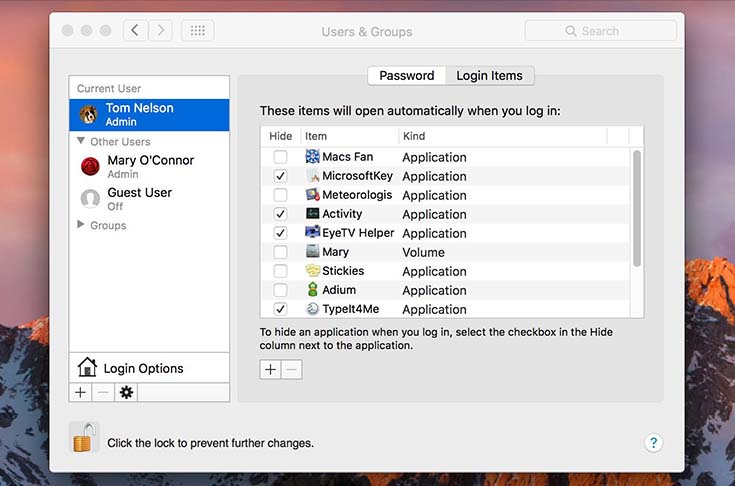
Manage Login Items: New Mac users tend to install a lot of different apps simply to try them out. However, some of these apps can create login items that might remain even after the application is closed. As you can imagine, the more items you have loaded up on start the longer your startup will take. You can review your login items in your System Preferences. This is where you’ll see a list of applications that can be removed by clicking on the minus symbol. This is also where you can load other apps that you actually want to launch as soon as your operating system boots up.
Closing Apps: Another interesting thing about Macs is how it handles applications. Windows users will be surprised to know that they can’t fully close applications by clicking on the “X” symbol. The red button on a Mac doesn’t quit the app but instead hides it. The yellow button (located in the middle) minimizes the open application, while the green button maximizes the window. To fully close an application, you need to click on its Dock icon and pick “Quit”. You can also use the keyboard shortcut Command + Q while using the app to have it shut down.
Conclusion
We hope that we helped you learn all you need to know about setting up setting up a new Mac. Even though this is an easy process, it is important to understand its every step. This way, you can get the best possible user experience right from the start.
In case you have an advice that you think we should include in this guide, feel free to share it using the comments section below. Thanks for reading and we hope you’ll enjoy using your brand new Mac!


