
Even though we all have access to our own iCloud Drive space (all you need to have is your own Apple ID), not many of us know how to use it. If you are a long-term Apple user, you are probably aware that Apple isn’t exactly best when it comes to complex and streamlined services. Even though many of the company’s services and products are highly polished and easy to use, there are some not as shiny examples from the past. Just remember how Apple Music looked like when it first launched.
You are probably reading this article because you want to learn more about iCloud Drive. Some of you might be completely new to this service, while others might want to learn more about this option. Either way, you are at the right place. After reading this guide, you will learn all you need to know about the iCloud Drive, how to pick an appropriate plan, and how to easily manage your files from your iPhone, iPad, and Mac.
What is iCloud Drive?
Apple’s cloud storage service launched back in 2011 and has been greatly expanded since. This is the very core of several important services, in which center is the iCloud Drive.
This feature lets you save different kinds of media (like photos and videos), as well as documents, music, and even app data. Upon its launch, users were really able to access those files and to freely control them but lucky for all of us, Apple has decided to lift some restrictions. Today, you can access all of your files and data from your iOS device (iPhone, iPad, and iPod Touch), as well as from your Mac or Windows PC.
Even though you are free to add and remove as many files as your Drive’s space allows you, there are certain portions that you can’t control (at least not directly). For example, there are your device’s backups. This is why, when you buy a brand-new iOS device, you can simply sign-in using your Apple ID and download all your personal information, applications, and media.
iCloud Drive: How much this feature costs?
Upon creating a new Apple ID and after signing up for iCloud, you will receive 5GB for free. However, this space is not only reserved for your Drive, but also for Mail, Backups, and iCloud Photo Library. Still, 5GB of space isn’t much these days. This is why Apple offers different upgrade options that are premium priced. You can upgrade to 50GB, 200GB, 1TB, and 2TB. This is how much you’ll need to pay (note that you’ll need to pay monthly) if you’re in the United States:
– 50 GB is priced at $0.99 (monthly);
– 200 GB is priced at $2.99 (monthly);
– 1TB is priced at $9.99 (monthly);
– 2TB is priced at $19.99 (monthly).
Note that Apple provides different prices for different countries and markets, so you’ll need to visit the iCloud Storage Plans and Pricing to check out the prices for your country.
iCloud Drive: How to upgrade to a larger tier?
You can check out the iCloud Storage prices and make a purchase from your iPhone, iPad, iPod Touch, Mac, and PC.
For your iOS device, you will need to go to Settings > (Your Name) > iCloud > iCloud Storage. If you are currently using iOS version 10.2 or earlier, go to Settings > iCloud > Storage. Tap on the ‘Buy More Storage’ or ‘Change Storage Plan’. You should see a list of available plans and their pricing options. Simply tap on the one you need and you can make the purchase using your Apple ID credentials.
On your Mac, you need to click on the Apple icon (located in the top left corner) > System Preferences > iCloud. Click on ‘Manage’ in the lower right corner of the windows, and then click on ‘Buy More Storage’ or ‘Change Storage Plan’. Use your Apple ID credentials to authorize the purchase.
iCloud Drive: How to set it up?
Your iOS device will provide an easy way to sign up for the iCloud Drive the first time you set up your device. However, there are those of us who are eager to skip this introductory setup. Don’t worry, you can still set up iCloud at any time from the Settings App.
To set up iCloud Drive, go to Settings > iCloud > iCloud Drive > Tap the On/Off button for iCloud Drive. In case you don’t receive the iCloud Drive app icon on your device’s Home Screen, go to the Settings App once again. Go to iCloud > iCloud Drive > Switch ‘Show on Home Screen’ to ‘On’. If you ever decide to hide it again, you can use the same process.
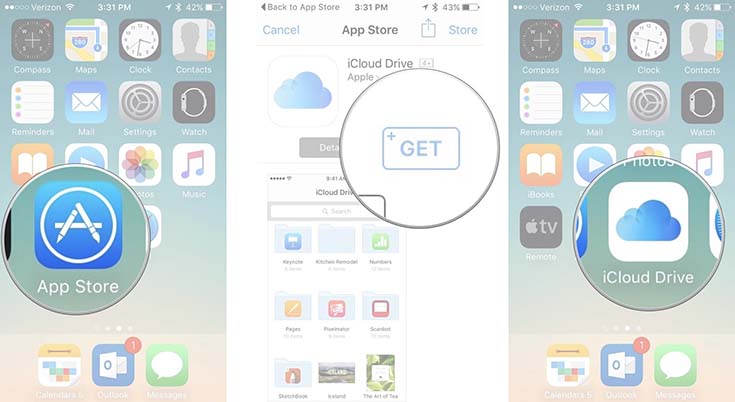
If you use iOS 10, the process of enabling this feature is a bit different. Since Apple now offers a way to delete its stock apps, you will need to visit the App Store from your Home Screen. Search for the iCloud Drive app and download it. That’s all. If you decide you don’t need it anymore, you can simply delete it from your device just like you would delete any iOS app.
iCloud Drive: How to access it on your Mac?
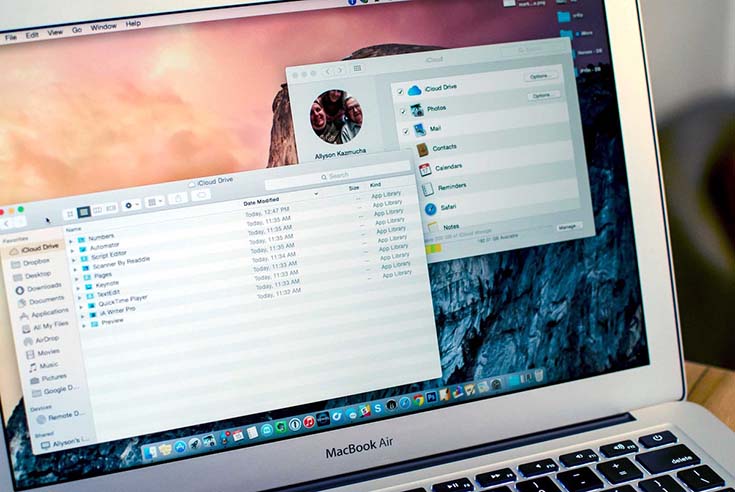
Apple’s iCloud Drive stores all your files on the company’s servers. However, you use it just like you would use Finder on your Mac. You can create folders and organize files, as well as remove any of them. Here’s how you can use the iCloud Drive on your Mac.

On your Mac, the iCloud Drive folder is located within Finder by default (in the Favorites section). What this means is that you need to open Finder, and locate the iCloud Drive within the left-positioned Favorites section. You can also click on the Go menu, found at the top of any Finder menu (which is helpful if you previously removed it from your Favorites. There is also one additional way, which is perhaps the easiest one. Simply use the keyboard shortcut Command Button + Shift + I.
What you’ll see is a list of available folders. You can remove many of them, but you can also add new ones. To do that, right-click inside the Finder window and pick “New Folder”. Enter a name for it and you’re done. As you can imagine, you can create folders within existing folders in the same manner.
iCloud Drive: How to access it on your iOS device?
As told in the previous section, you can create and delete iCloud folders on your Mac. However, you can do the same on your iOS device.
To do that, go to the iCloud Drive app on your iOS device. Tap on ‘Select’ in the top-right corner of the screen, and then tap on ‘New Folder’ (found in the bottom left corner of the screen). You will see a new, small window where you’ll need to enter a name for your newly created folder. Tap on ‘Create’ and that’s it. Once again, you can create new folders within your existing folders in the same manner.

When it comes to moving folders on your iOS, things are a bit different than on your Mac. You first need to open the folder (or the file/files you want to move) and then tap on ‘Select’ in the top-right corner. Select the files you want to move and tap on ‘Move’ in the bottom center of the screen. Select the folder you wish to move the files to. Note that if you don’t have an app in your iCloud Drive that supports the file extension you want to move, you will be asked to create a new folder instead. Don’t worry, this sounds a bit confusing even to us who are experienced, iOS users. However, once you do this once, you’ll see that it only takes a couple of steps to perform this operation. Still, we feel like Apple should have done a slightly better job of providing us an easier way to perform these basic operations.
iCloud Drive: What about third-party apps?
There are numerous third-party iOS apps that are designed to access your iCloud Drive. In many ways, this is an excellent thing since it allows easy synchronization between several devices. For example, you want a text editor to sync your documents on-the-go if you use both your iOS and Mac to edit those files. However, it is not a bad idea to occasionally check if some older apps (that you don’t use anymore) have some data stored in your Drive.
If you don’t want, or if you don’t need, certain apps to store their data to your iCloud account, you can revoke their access. Note that data will instead be stored locally on your iOS device or your Mac – which means that it won’t be synced.
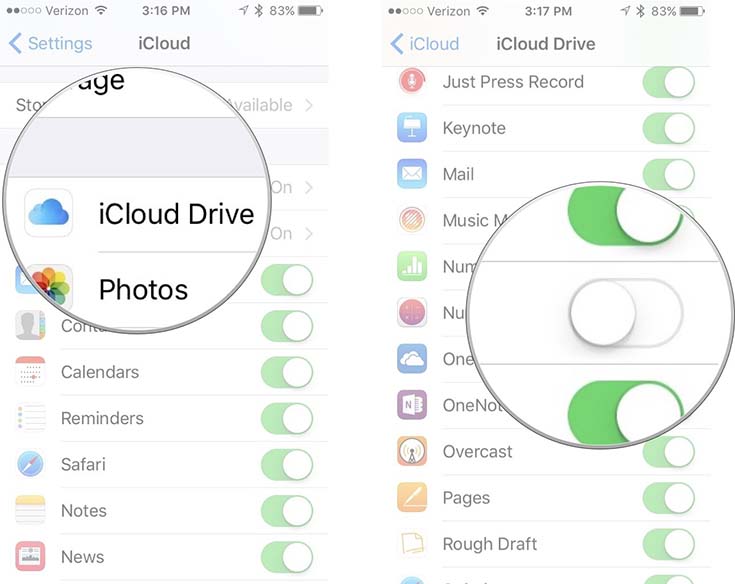
To revoke access to certain apps, go to the Settings app and tap on iCloud > iCloud Drive. You will see a list of apps that access your Drive, so all you need to do is to toggle the switch for any app you want to disable. In case you change your mind at any time, you can perform the same operation to enable access.
It is also worth knowing that you can do the same on your Mac. Click on the Apple icon in the top-left corner of the screen, and go to System Preferences > iCloud. Now you will need to click on Options, next to iCloud Drive. Uncheck the app you don’t want to store files in your Drive. Click Done and that’s it.
iCloud Drive: How to migrate from other services?
At some point, you’ll want to migrate from some other cloud service to iCloud. This could be a good idea if you decide to update to a premium-priced tier, which why using another cloud platform is not needed anymore. There are several popular cloud storage solutions like Dropbox, Google Drive, and One Drive. We’ll show you how to move your files from all these services.
Dropbox: By default, your Dropbox folder is located in your Finder’s Favorites section. This means that you need to open Finder and locate Dropbox in the sidebar. You’ll see a list of folders that are currently stored on your Dropbox account storage. Select the files and folders you want to move and simply drag them to iCloud Drive in the sidebar of the Finder window. Your files will be automatically synced with iCloud Drive and will also be removed from Dropbox. In case you don’t need this cloud storage option anymore, you can delete it from your Mac so it doesn’t take any of your computer’s resources.

Google Drive: Just like Dropbox, Google’s cloud storage option also installs an icon to your Favorite folders within Finder. Locate Google Drive and select the folders and files you want to move. Drag and drop them onto iCloud Drive and you’re ready to go.
One Drive: Unlike other cloud services, Microsoft’s One Drive doesn’t automatically create a Favorites shortcut. This means that you’ll first need to locate the One Drive file which can be done by using the Search function. Find the files and folders that you’d like to move and drag-and-drop them to iCloud Drive. Delete One Drive from your Mac in case you don’t want to use it anymore.
iCloud Drive: How to use it on a Windows PC?
Since Apple is the creator of iOS and Mac OS X (or Mac OS), the process of setting up your iCloud drive is very simple. On top of that, users of iOS and OS X can use apps like Pages, Numbers, and Keynote, which don’t run on Windows PCs. Still, this doesn’t mean that Windows users should be left out.
If you use iCloud and a Windows PC, you are not in the same position as a person that’s entirely within Apple’s own ecosystem. Still, you can backup photos, sync contacts, and calendars, and you can use iCloud Drive as well. Note that iCloud still doesn’t replace iTunes if you’re using this software to backup your iPhone or iPad, which means that you’ll need to have both of these services installed on your PC.
First, you need to install iCloud on your PC. This could be done by opening the iCloud website and clicking on “Setup Instructions”. You will be taken to a new page where you can check out the official requirements, and from where you can download iCloud. Among the requirements, you’ll find Windows 10, even though you can install and use this cloud service on Windows 7 and up.
Upon installing iCloud on your PC, you will see a window on the screen asking you to sign in using your Apple ID. You should use the same Apple ID as on your iOS device since the goal here is to sync files between your iOS device and your computer. Once signed in, you will see a number of different options where you can pick what you want to sync. The first option on the list is iCloud Drive, so make sure that you pick this option. Among other options are Photos, Bookmarks, and more. Upon finalizing the installation, you will have your iCloud Drive in your User folder.
Anything that you move to that folder (as well as anything that you remove from it) will be synced with other devices and with iCloud’s web option. The only requirement here is to be signed into different devices using the same Apple ID.
It is also worth noting that you can sync your photos between your iOS device and a Windows PC. By default, Apple’s cloud service creates an iCloud Photos folder in your Pictures folder. Any photos you take on your iPhone or iPad will, by default, appear in this folder. You can also change how this works by visiting iCloud’s settings.
Just like you can do on your iPhone and/or Mac, you can use iCloud’s Windows interface to upgrade to a larger tier. This is done by opening iCloud on your Windows PC and clicking on the “Buy More Storage” button.
iCloud Drive: Limitations
When it comes to using iCloud Drive, there are some limitations. However, only advanced users will need to take a closer look at these limitations since average users aren’t likely to cross them.
You are free to store any type of file in iCloud Drive, as long as it’s less than 15GB in size and you don’t exceed your iCloud storage limit. The good news is that there’s no restriction on file type or file extensions. However, you will need to have a third-party app on your iOS device to open and to edit those files.

When you set up iCloud, you will receive 5GB of storage free of charge. This space is divided between iCloud Backup, iCloud Drive, iCloud Photo Library, iCloud Mail, as well as any information or data stored by third-party applications.
In case you delete a file, know that it will be restorable for the next 30 days. However, you will need to use iCloud’s Web interface to restore it. First, sign in to iCloud.com and go to Settings. Under ‘Advances’, find the ‘Restore Files’ option. This is where you can see a list of deleted files as well as easily restore them. Note that after 30 days, files will be permanently removed.
iCloud Drive: The best tips and tricks
Locate and access iCloud Drive from anywhere: As we previously explained, iCloud Drive resides within Finder’s sidebar. However, it is easy to delete its icon by accident. If you don’t see iCloud Drive, enable it in Finder’s preferences in the Sidebar tab. When Finder is the active app, you can use a keyboard shortcut (Command + Shift + I) to jump to your cloud storage.
Control Your Data: There are numerous iOS users on a contract with a limited data allowance, which is why it’s important to know how to control the data flow. On your iOS device, go to Settings > iCloud > iCloud Drive and stop individual apps from using Drive altogether. However, this stops those apps from syncing files. This is why it’s a better idea to scroll all the way to the bottom of the iCloud Drive settings and turn off ‘Use Mobile Data’ to restrict iOS app from syncing files unless you’re using Wi-Fi. This is particularly useful if you are roaming on a foreign network where higher data charges usually apply. Furthermore, you can go to Settings > Mobile to restrict different portions of iOS from using your cellular data connection.
Move Currently Open Files: At first, the iCloud Drive option was somewhat limited. However, today we use it freely and move around files even while they are open. In case you save your file to a wrong place (assuming that you’re still working that file and keeping it open), you can re-save it to your Drive. Open the File menu, located in the top-left corner. From there, choose the ‘Move To’ option and navigate to the folder where you want to store your file/document. This can also be done by clicking on the file’s name in the title bar, where you can also attach different Finder-specific tags.
Use iCloud to send large files: When it comes to uploading and sending large files, many of us turn to cloud storage solutions. This is needed because Mail allows us to upload and send attachments of up to 40MB in size. Instead of using a cloud service and pasting links into your email message, you can use the Mail Drop feature, introduced with Mac OS X Yosemite. The first time you attach a large file to a message, you will receive a warning that you’ve exceeded the maximum size. If you decide to proceed, Mail will display options that include a Mail Drop feature. If you click on that and as long as the attachment is less than 5GB in size, it will be uploaded to iCloud. The good news is that this attachment won’t be counted against your storage limit and you won’t be able to see it in your Drive. The attachment will then available to 30 days. Please note that even though Mail Drop doesn’t count against your iCloud storage limit, there is still a total 1TB limit in any 30-day period.
Conclusion
We hope that we helped you learn more about iCloud Drive. As you can see, this is a very interesting cloud storage solution that comes integrated with your iPhone and Mac. So, instead of using a third-party solution, you can stay within Apple’s ecosystem of apps and services.
In case you have something to add, feel free to post a comment and share your findings.
