If you’re a long-term Mac user, than you probably know that Disk Utility hadn’t changed much over the years. We’ve seen numerous OS X versions being released on a regular basis, but it seemed like Apple didn’t want to change this well-known tool. However, with El Capitan, the new Disk Utility received a fresh coat of paint, but there are some important behind-the-scenes improvements as well.
Even though many of you already used Disk Utility at some point (probably when you had a startup issue), the majority of users never really took their time to see what this tool can do. This is why JustGoodBites brings you a short and helpful overview of this tool. Our goal is to teach you some of the most important terminology, as well as why and how to use different features of this application.
Terminology
Before we dig deeper into what Disk Utility can do, let’s take a minute to talk about terminology calibration. This will help you understand better what we are about to tell you.
No matter if you use a USB thumb drive, an SSD, or a full-featured HDD (traditional hard drive), your OS X will refer to it’s as a “drive”. Before using a new physical drive, you have to format it and make its raw storage compatible with your OS X version.
Additionally, you need to know about partitions. These are logical divisions of a physical drive that allow different formatting patterns on one drive. Each partition can appear as a separate drive, or as a separate disk icon in the Finder. For those of you who are interested in Terminal, you can search for all partitions by listing the /Volume directory.
User Interface (El Capitan’s Disk Utility)
When you open this application while running El Capitan, what you’ll see is a brand new interface that is now more user-friendly. The UI is much cleaner and definitely less intimidating. Even though many users don’t like this kind of transition and they tend to think that Apple removed some features, this is actually not true. As we’re about to show you, these features simply appear to have gone, but they are still there.

Your Drive’s Overview
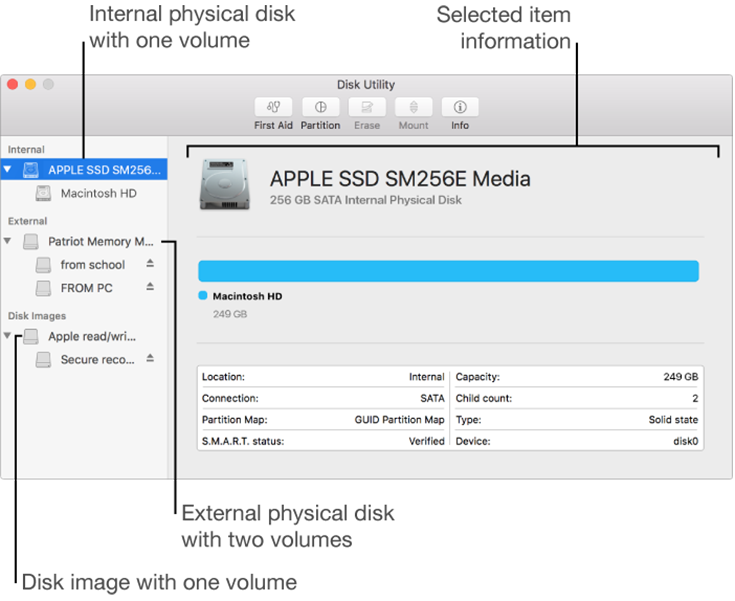
First of all, Disk Utility gives you an overview of your physical drive’s contents. The main portion of the view is now taken by a color-coded indicator of much space is used by different types of data. Blue is for applications, pink for photos, green for movies, orange for audio, and more. Below this indicator, you can find a table of information, like your physical’s drive total capacity, used space, type of connection, and similar.
Along the left-positioned sidebar, you will see your internal and external volumes. There is also the change from a mix of buttons and tabs to a single row of buttons in the upper part of Disk Utility.
What is Missing?
In case you used Disk Utility in previous OS X editions, you will notice that a “Verify” button is missing. This is one of those features that are truly missing. Disk Utility can no longer verify if your disk(s) are in good health, but it can do a full repair by clicking on the “First Aid” button. Note that this option can be used with drives that can be unmounted.

Another important feature that was left behind is the ability to repair permissions. I believe this to be one of the best-known tools of Disk Utility, and many of you probably solved numerous smaller issues by using this option. However, El Capitan comes with the new System Integrity Protection (SIP) that prevents permissions on files being modified. This means that there is no need to repair permissions anymore.
Finally, the ability to burn CDs and DVDs from Disk Utility is also gone. I believe we all expected this because Macs now come without an optical drive.
Active Features
Partitioning
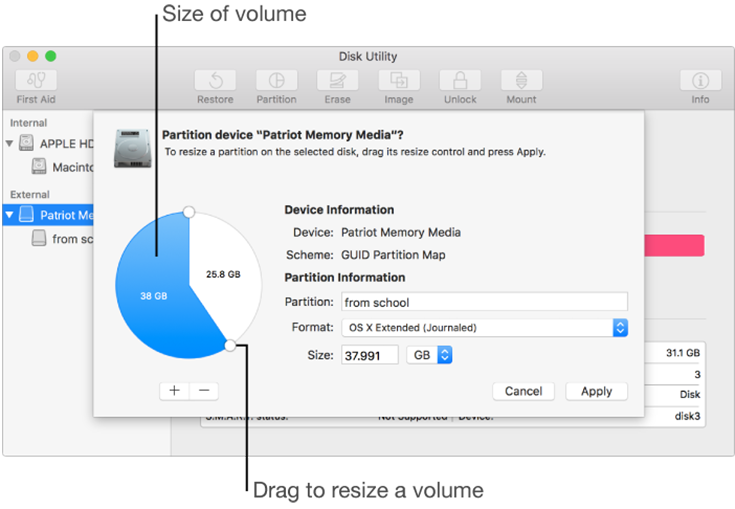
The new Disk Utility can still partition a disk, where you drag a handle to create and modify the size of a partition. This way you can create several partitions that are displayed as separate volumes in the Finder sidebar.

To partition a drive, select the device in the sidebar and click on the Partition button. Now click on the Add button, and this is where you can see the current state of your drive. You can create multiple volumes at once by selecting the new partition, then clicking on the Add button. Choose how large those volumes should be and name them. Before finalizing the process, you will have to choose from several possible formats:
- OS X Journaled (Journaled): Uses the Mac format and in many cases, this should be the one to choose if you simply want a new partition without losing any of your data.
- OS X Extended (Journaled, Encrypted): Uses the Mac format as well, but encrypts the partition and requires a password.
- OS X Extended (Case-sensitive, Journaled): Uses the Mac format and is case sensitive to folder names. For example, “Photos”, “photos”, and “PHOTOS” are three different folders.
- MS-DOS and exFAT: Used for Windows volumes that are 32GB or less or that are over 32GB.
Checking a Disk or Volume for Problems
You can use Disk Utility to check for problems and automatically repair them by using First Aid. You will have to select a disk or volume from the sidebar and click on First Aid.
In case you run First Aid on a whole disk, Disk Utility will perform the partition maps as well as some additional checks. If you run First Aid on a volume only, Disk Utility will verify the content of only that volume.
In case of Disk Utility detects a serious issue with your disk, you will receive a message that your disk or volume will fail. This is a good indication that you need to back it up as soon as you can and replace it. If Disk Utility finds solvable problems, you will be asked to repair a disk.
Repairing a Disk
You can only repair your OS X drive or volume only before booting into the operating system. While restarting, hold down the Command and R keys after you hear the startup chime.
- Click on Disk Utility, and then click Continue;
- Select the disk you’d like to repair from the sidebar;
- Click on the First Aid button;
- Finally, click on “Repair Disk”.
There are several possible outcomes to this process. You can receive a message saying that your drive appears to be okay, which means you’re done.
In case of an issue, you can receive a message mentioning “overlapped extent allocation”. This means that two or more files occupy the same space on your disk and that at least one of them is corrupted. You will need to check each file manually, and they can be found under “DamagedFiles” folder at the top level of your disk.
In case of a serious issue, Disk Utility will say that “The underlying task reported failure”. In this scenario, it is advisable to try to repair the disk once again. If this returns the same error, you should back up as much data as you can, reformat the disk, reinstall OS X, and then restore your data.
Conclusion
These are some of the basic as well as some of the most important tools in Disk Utility. As you can see, the overhauled version is still quite capable and can be used to detect and fix problems with your OS X version.
Disk Utility is an application that is well worth getting to know and should be your go-to application when you run into trouble with a disk.


