
As you’re probably aware by now, Apple’s newest OS X version, called El Capitan, was officially released a few days ago. Since this is a completely free upgrade for existing Mac users, it is expected that El Capitan already found its place on millions of OS X machines. In case you still haven’t upgraded and if you need an advice on how to prepare your Mac, you can find more information on this topic in one of our recently published articles.
Ever since Apple switched to using Intel-based processors, PC users were able of installing OS X onto their machines. These so-called “Hackintosh” computers are able of running full-featured OS X versions, allowing PC users to switch over to Apple’s operating system without having to buy new devices.
Only a few days after the El Capitan worldwide release, one of the best-known tools for installing OS X onto PCs was updated with support for the newest OS X version. In case you’re planning on running a Hackintosh, here is a step-by-step guide on how to install El Capitan onto your PC.
Requirements
- You need to have an access to a Mac in order to download El Capitan from the Mac App Store and install it on your Hackintosh;
In addition, you need to have a Mac to prepare the UniBeast USB drive, which is necessary for the final installation. So even though you can download El Capitan to your PC, there is no way to prepare the needed files without using OS X in the first place.
- Spare USB drive with 16GB of available space;
Note that the drive needs to be formatted during the installation process, so make sure to check if any important files are present on the USB drive.
- An Intel-based PC capable of running El Capitan;
- A full-system PC backup solution.
Even though this is not a general requirement, it is always a good idea to back-up your PC. This is the only way to ensure that you can recover lost files in anything goes wrong.
Step-by-Step Guide (OS X El Capitan installation – Hackintosh):
Step 1.
The first thing you will need to do is to download Apple’s OS X El Capitan from the Mac App Store. Simply sign-in using your Apple ID credentials and download the newest OS X version. You can also find links to Apple’s El Capitan installation files online, but there’s no need for this since you can download needed files from the App Store completely free of charge.
Step 2.
In order to create a bootable USB drive, you will need to use the latest version of UniBeast. The version that supports the installation of El Capitan is 6.0.0.
Step 3.
Now that you have your El Capitan installation files and the newest version of UniBeast prepared, you need to create a bootable USB drive. Plug in the drive into your Mac and use the Disk Utility application in OS X.
Step 4.
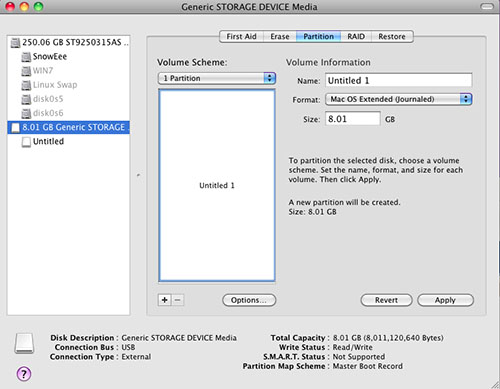
Make sure your USB drive is selected in the left position pane. Click on the Partition tab from the right-positioned menu. The Partition tab is the middle-positioned option on the menu, which also shows First Aid, Erase, RAID, and Restore tabs.
Step 5.
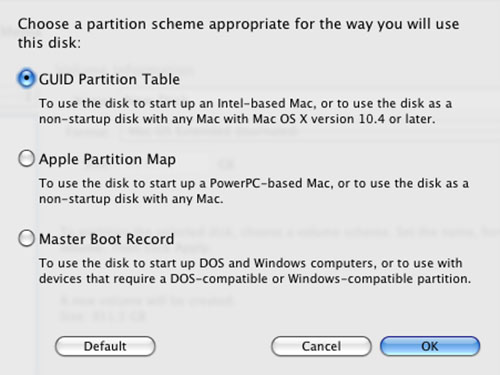
Once you have selected the Partition tab, you will see a set of options right beneath the menu. Choose “1 Partition” from the drop-down menu beneath Partition Layout. Click on the Options, which will open a new window. You need to make sure that the GUID Partition Table is selected, and then click OK to proceed to the next step.
Step 6.
One final step that needs to be done inside of Disk Utility application is to select “Mac OS Extended (Journaled) from the Format drop-down menu. Finally, click Apple and choose Partition.
Step 7.
Launch UniBeast from the downloaded executable file. In case you run into a startup problem, make sure that the El Capitan installer is located in the /Applications folder. The file should be named as “Install OS X El Capitan.app”.
Step 8.
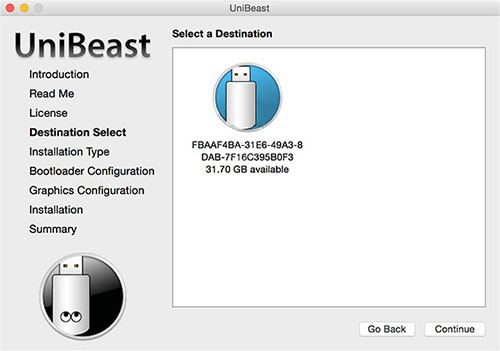
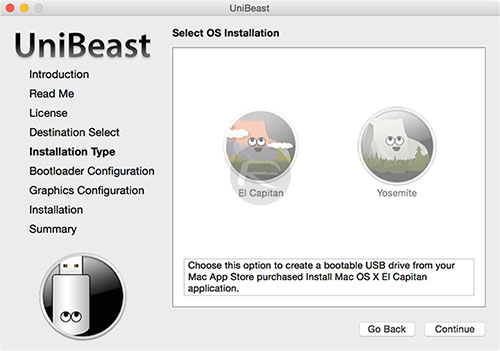
While going through the needed steps inside of the UniBeast app, make sure to select your newly formatted USB as a destination drive, and also choose “El Capitan” when the app asks for an OS X version to install. The Bootloader Configuration screen should show you “UEFI Boot Mode” or “Legacy Boot Mode”, so make sure you check one of these options.
Step 9.
Before proceeding to the final step in UniBeast, the app will ask for your Mac admin password. Fill in the required field, and finally click on Install.
Step 10.
Now it’s time to guide you through installing OS X El Capitan on your PC. You will need to choose to boot from USB, which can be usually done via the BIOS settings. You PC will try to boot from newly formatted OS X drive, so you should see an option to Boot from OS X. After the installer loads up, set the desired language and proceed to the next step.
Step 11.
Prior to proceeding with the installation, you should format the drive in your PC that you plan on installing OS X too. To do this, select Utilities > Disk Utility from the top positioned menu. Select the destination drive and click on “Erase”. Make sure to use OS X Extended (Journaled) option while formatting the drive. Also, select “GUID Partition Map” as the Scheme.
Step 12.
Now, all there’s left is to wait for El Capitan to be installed. On the installation is done, your PC will restart and once again boot from the USB drive. However, now you will need to select the “Boot from Macintosh HD”. This will guide you through the final steps of OS X installation.
Step 13.
Since another important Hackintosh tool hasn’t been upgraded with El Capitan support, you will need to use the USB installer to boot OS X every time your power on your PC. This tool, called MultiBeast will allow your PC to boot into OS X without the USB drive, but you will need to wait until this update happens.

Have fun using the newest OS X version on your Hackintosh PC!
In case you have any helpful tips and advice, please let us know, and we will make sure to share them with our readers.
