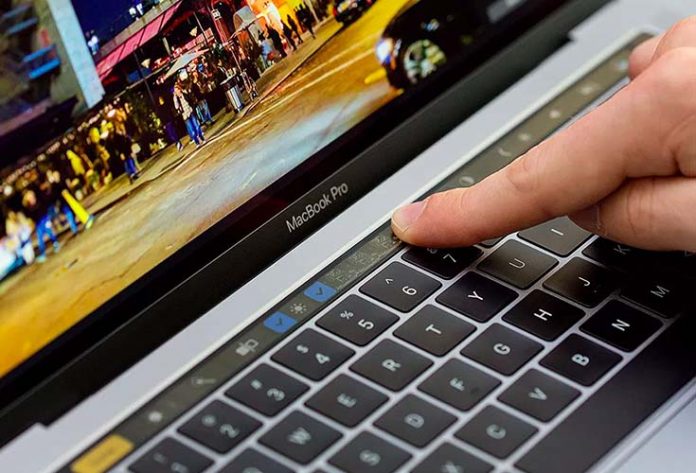
As you’ve probably heard, the new MacBook Pro is finally reaching its new users. We recently took a look at this brand-new notebook and its features and posted an in-depth review. Now it’s time to take a deeper look at its flagship feature, which is the dynamic and customizable Touch Bar, found just above the keyboard. Since this is the first time that users are encountering Touch Bar, very few are aware of all the options it holds. This is why we decided to write a guide on using the Touch Bar, in addition to some helpful advice on how to get the most out of it.
Without further ado, let’s jump right in.
Touch Bar: What is it?
To start, let’s see some basic terminology that will help us explain how to use the Touch Bar.
On the far left, you will usually see a region that has one of a few options. These are the Esc, X, or Done button, which depends on context. The middle portion is called the App Region. This is where you’ll see different virtual buttons and functions that are reserved for whichever app you are using at the moment. Then, the Control Strip can be found on the far right. These are four buttons that you can customize to do certain functions across macOS. However, you also have the ability to add more than four buttons, where you can tap the chevron key and expose the Expanded Control Bar with additional buttons and features.
[vsw id=”4BkskUE8_hA” source=”youtube” width=”735″ height=”367″ autoplay=”no”]
Now, let’s go through some of the built-in applications and investigate how you can interact with them using the Touch Bar.
Using Touch Bar with Safari
By default, when you launch Safari you will see the following options on the Touch Bar: back and forward buttons, a ‘new tab’ button as well as a set of thumbnails showing the currently open pages. This means that you can easily switch between currently active web pages by tapping between open tabs, or by swiping across the App section of the Touch Bar.
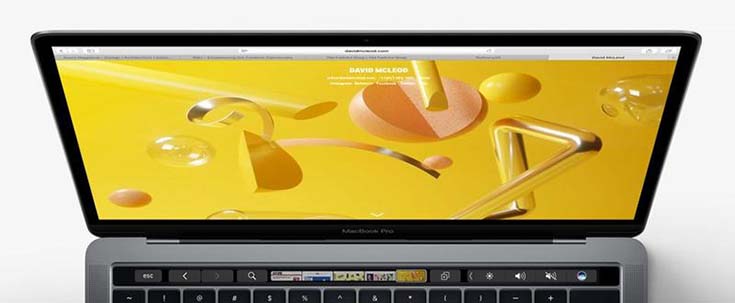
From left to right, you will first see the Escape button, as well as back and forward button. Next, there is a ‘search’ button that opens the URL bar and transforms the Touch Bar into a series of icons showing your favorite web pages. As you’ll see, you will still have the Escape button active, which is a way for you to go the previously open set of functions. In addition, the Touch Bar also shows currently open pages, as we explained in the previous paragraph, in addition to a new tab button. Finally, there is the condensed Control Strip that shows (by default) buttons for brightness, volume, mute audio, and Siri. We will talk about how you can customize the Control Strip later in this article.
Pro Tip: While using Safari, the Touch Bar will pop up a scrubbing control each time a video begins to play. This even happens when you play YouTube video. However, you might not be aware that the Touch Bar allows you to scrub through an ad, even a non-skippable 30-second pre-roll ad. This seems to be a ‘flaw’, so Apple will most likely patch this option, but this doesn’t stop you from using this helpful function in the meantime.
Touch Bar & FaceTime
Apple’s FaceTime is a great (and free) way to stay in touch with your friends, colleagues, and family. The new Touch Bar has been optimized to make it easier for you to respond to FaceTime calls.
Once you Mac detects an incoming FaceTime or phone call (if you linked your iPhone to your computer), the Touch Bar will change dynamically as well. Simply tap the green Accept button to take the call, or the red Decline to pass the call. You will also be able to see who is calling you, and you can even respond with a message if you don’t want to answer right away.

Pro Tip: It is also possible to initiate FaceTime calls from your Touch Bar, but only if you have set it up so the right contact is displayed there. Launch the FaceTime app on your Mac, and select a contact that you’d like to call and view the full contact card. Now, tap the person’s name on the Touch Bar to call them via FaceTime. Once the conversation starts, the Touch Bar will change. It will also show how long the conversation has lasted, and it will give you options to end the call or mute audio.
Using Touch Bar with Photos
By default, the Touch Bar will show a swipeable gallery of image thumbnails. You can use it to easily jump to the image you want to work on. On the left side, you will also see a button that allows you to like an image, as well as a key that opens the Edit panel. Once you tap on this key, you will see the real power of Touch Bar, as it completely changed into a set of virtual tools that allow you to fine-tune images.
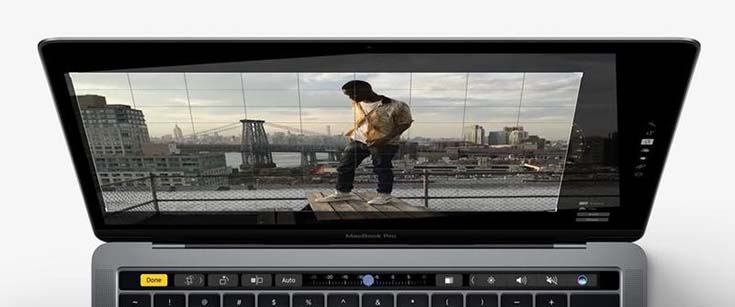
The Edit button will open options like crop, auto edit, and other editing functions. Perhaps the most interesting one is the rotation tool in the center. You can swipe across to rotate the image to your preference. Once you are finished, simply tap on Done and you will go back to the default Touch Bar layout.
Using Touch Bar with Maps
Every time you open the Maps app, you will see a couple of very simple options. You get icons for restaurants, cafes, shops, and cinemas. Tapping on one of these options will run a search for nearby businesses answering that description.
What is surprising is that the Touch Bar becomes much more helpful once you dig a bit deeper into the Maps app. For example, you can select any of the listed business from the initial search, and you will get a virtual button for bringing up directions to it, as well as controls to go to the firm’s website, make a call, add it to your favorites, and even to send the details to one of your contacts.
Using Touch Bar with Mail
Apple’s Mail app is another really strong example of the Touch Bar’s power since it brings the convenience of iOS’ Quick Type predictive keyboard to Mac. However, as our previously posted review of the new MacBook Pro will tell you, this feature won’t work for everyone. While some of you (especially those with bigger hands) will be able to create a workflow that easily incorporated the Touch Bar’s Quick Type, other won’t find this feature as helpful.
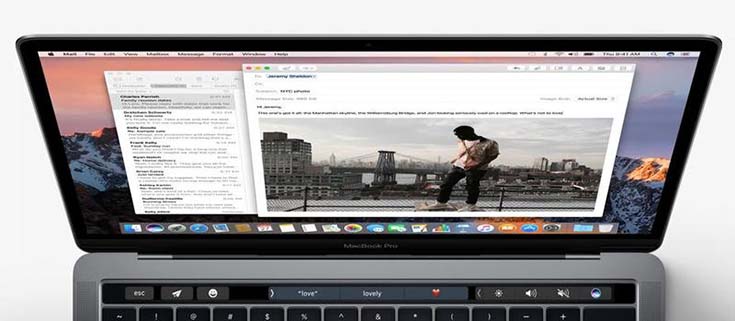
Apart from the Quick Type, there is also an emoji button that can be found within the usual generic controls on the right side of the bar. This button (which can be found both in Mail and Messages) transforms the Touch Bar into a swipeable menu of emoji. By default, you will see your most frequently used emoji, but there is a button on the right which allows you to see the entire collection. Simply tap the emoji you want to insert in your message, and you are done.
Using Touch Bar with Boot Camp
Maybe you’re wondering what happens with the Touch Bar if you decide to install and run Windows through Boot Camp. The Touch Bar will still be useful since it will display the standard controls. These include volume, brightness, keyboard brightness, media controls, and other options.
Touch Bar: Tips & Tricks
What’s Happened to Function Keys?
So, many of you are certainly wondering where are the function keys since the Touch Bar replaced them. Don’t worry, they are still easily accessible. All you need to do is to hold down the Function key on the keyboard, and the Touch Bar will promptly display the familiar Function keys.

Pro Tip: There are ways to select other kinds of virtual keys that appear once you hit the physical Function key on your keyboard. However, to do this you’ll need to visit System Preferences and tinker with some of the available options. Read the next section to learn more.
How to Customize the Touch Bar?
As we said in the previous paragraph, you can change what the Function button does to the Touch Bar. This can be done by going to System Preferences > Keyboard, and searching for the option that says: “Press Fn key to”. You will see two options here. By default, the Touch Bar will bring up the Function keys, but if you pick “App Controls” in the menu above, you can make the Fn key show or expand the Control Strip. If you select “Expanded Control Strip”, you can make the Fn show the app-specific controls. So, you have a couple of different options here specifically designed for those who don’t use the Function keys but instead want additional Touch Bar options.

Now, let’s take a look at how to customize the controls and icons that the Touch Bar displays for each application. Selected applications will let you bring up a palette of available functions on the screen, which means that you’ll have to fine-tune this option by visiting the app’s settings, not System Preferences.
For Finder, for example, you need to select View > Customize Touch Bar, and you’ll get to see the available options on-screen. You need to click and drag your chosen function down to the bottom of the screen, whereupon it will appear on the Touch Bar.
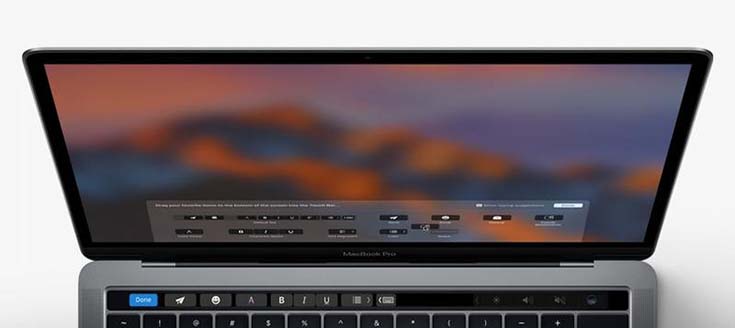
To change how Touch Bar behaves in other apps, you need to open each app and find the option to customize the Touch Bar. This option can be a bit scattered, but looking under View is a good place to start. On top of that, you must know that now all apps allow Touch Bar customization.
Here are some of the macOS app and where to find the option to customize Touch Bar:
– In Safari, go to View, and then pick Customize Touch Bar. You will see options that include Add Bookmark, Reader, Share, Tab Overview, Home, History, Favorites Bar, Autofill, and Sidebar.
– In Notes, go to View, and then pick Customize Touch Bar. There aren’t too many options, but this is where you can turn on/off typing suggestions.
– Applications like Maps, Contacts, and FaceTime don’t have the option to customize the Touch Bar.
How to Get the Escape Key on Touch Bar?
For many us, the Escape key is one of the often-used keys. Lucky for us, most of the built-in apps show the Esc button on the far-left side, which includes Photos, Mail, Safari, and Keynote. If the app you’re often using doesn’t have the Esc button, you should take a look at the customization options we talked about in the previous segment of this article.
It is also possible to reassign one of the physical keys to act as Escape on a system-wide level. To do this, open System Preferences, and select Keyboard. Pick the Keyboard tab and click on Modifier Keys at the bottom right. Below the keyboard dropdown, you should see a list of four keys: Caps Lock, Control, Option, and Command. It is a good idea to avoid reassigning Control, Option or Command and opt to reassigning Caps Lock as you can achieve the same effect while holding the Shift key as you type. Select the key of your choice and select Escape from the drop-down menu. Finally, click OK to save your preferences.
Conclusion
We hope that after reading this article you now know a bit more when it comes to the Touch Bar. Even though many people believe that this is just a gimmick that won’t last long, we strongly believe that the future is bright for the Touch Bar. We just have to wait for third-party app developers to tackle this feature and show us different uses for it. Just like many times in the past, software developers will use their creativity to fully unleash the Touch Bar’s power.
If you have additional advice on how to use this feature, or if you discovered something interesting about it, do not hesitate to post your thoughts in the comments section bellow. We will gladly share your findings with the rest of the community.

