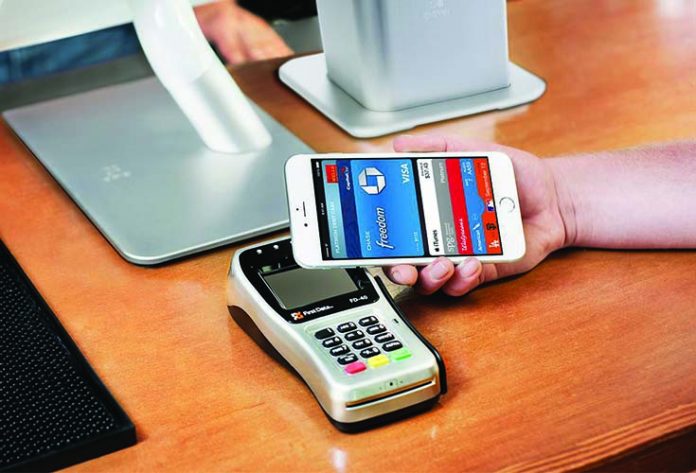
Even though mobile payment systems aren’t anything new, it took a couple of years for these systems and platforms to become widely accepted. Apple’s own take on a contactless payment system, called Apple Pay, allows you to pay in-store and in-app safely and securely using different kinds of payments cards. However, what exactly is Apple Pay and how do we set it up and use it? Well, this in-depth guide will show you everything you need to know before joining the bandwagon.
First, you will get to learn the basics about this technology as well as what it has to offer. Then, we’ll show you how to add new payment cards, as well as how to use Apple Pay to transfer funds in-store and in-app. Finally, we’ll take a look at how this technology is used on your MacOS computer, as well as other tidbits that you won’t find anywhere else. Without further ado, let’s jump right in.
What is Apple Pay?
By definition, Apple Pay is Apple’s own contactless payment system developed for the company’s range of smartphones, tablets, and computers. It was first announced back in 2014, during one of Apple’s media events. According to the company’s CEO Tim Cook, the reason why Apple decided to develop this technology was due to a broken magnetic stripe card payment process. In other words, the company wanted us to switch to a more technologically advanced payment method that is supposedly more secure.
Since 2014, this service went through a fast-paced development. At first, this payment method worked only with US-issued payment cards. In addition to being available in different countries, the company has done an excellent job of persuading both large and small business to support and integrate this system. Here’s a list of countries where Apple Pay can be used:
| Country | Date of Availability |
|---|---|
| United States | October 2014 |
| United Kingdom | July 2015 |
| Canada | November 2015 |
| Australia | November 2015 |
| China | February 2016 |
| Singapore | April 2016 |
| Switzerland | July 2016 |
| France | July 2016 |
| Hong Kong | July 2016 |
| Russia | October 2016 |
| New Zealand | October 2016 |
| Japan | October 2016 |
| Spain | December 2016 |
| Taiwan | March 2017 |
| Ireland | March 2017 |
| Italy | May 2017 |
Requirements
Before we start digging any deeper, let’s take a look at what you need to have in order to use this service. First of all, you need to have an eligible device. When it comes to iPhones, you can use the iPhone 6 and up as well as the iPhone SE. When it comes to iPads, you’ll need at least the iPad mini 3. When it comes to Apple Watch models, you can use the first generation model along with the current Apple Watch. For the full list of supported devices, you can check out this Apple’s web page. Next, you need a supported payment card from a participating card issuer. Finally, make sure your device is updated to the latest iOS version as well as that you’re using your own Apple ID.
Security
We all care about security, which is imperative when it comes to personal finances. This is why it’s important to take a closer look at what Apple knows about you and your payment cards.
Even since Apple Pay launched, the Cupertino-based company is doing its best to ensure us that our personal information is kept safe. What is interesting to note here is that the company is going one step further, which can be seen through messages that our sensitive information is actually safer on an iPhone than inside our own wallets. Even though it is hard to believe in that, the truth is that you don’t have to be afraid to use Apple Pay, especially if you take all precautionary measures.
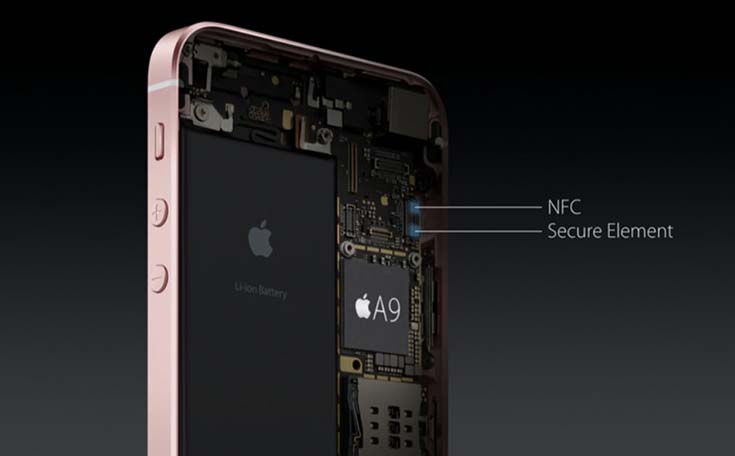
To begin with, it’s vital to know that our iPhones come with a dedicated chip called a Secure Element. This is where your personal information is stored, along with credit card numbers and payment data. In other words, the “flow” of this data is different from anything else on your smartphone and thus – it never gets uploaded to iCloud or any of Apple’s servers. Now, let’s get technical. Every time you use Apple Pay, your device’s unique Device Account Number is sent via NFC, along with a dynamic security code that is also unique to each transaction. This code replaces your credit card’s CCV. On top of that, Apple allows you to authenticate purchases using Touch ID. This is why in order to pay for something using Apple Pay, you need to place a finger on Touch ID to authorize the purchase. It is also interesting to note that when using Apple Watch, authentication is made via skin contact. This is why aside from entering a passcode, you need to wear your Apple Watch to finalize payments. Both of these technologies are preventing someone who has stolen your iPhone or Apple Watch to use Apple Pay in your name.
There is one final piece of information regarding this service’s security. Banks are quite confident in this service and they have opted to assume liability for any fraudulent purchases made both in retail stores and online using this service. This means that you get the same level of protection you get with traditional credit cards.
How to set up Apple Pay?
Now that you know what is Apple Pay, the service’s requirements and all you need to know about this service’s security, it’s time to teach you how to start using it. We’ll start by explaining how to add a new card using your iPhone.
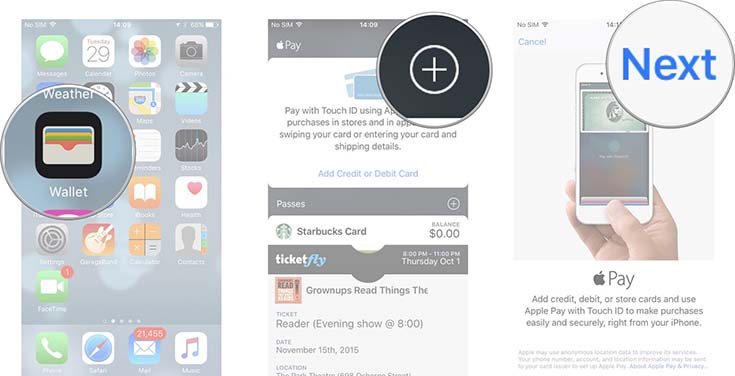
Installation: Apple Pay “hides” within the Wallet app, which can be accessed from your device’s Home screen. Located in the top-right corner, you’ll see the “+” button, which will initiate a setup process. There are several ways to add a new card, which can be done automatically or using the device’s camera which should successfully scan and read the needed information. To do this manually, click on Next on the setup screen. You’ll need to manually enter the card’s expiration date and the security code. Next, you’ll need to agree and accept the terms and conditions. This will lead you toward the final step, where you’ll need to enter a security code that you’ll receive via email, text, or call. If you wish to add more than payment card, you can repeat the setup process.
We also mentioned that you can use your device’s camera to avoid having to manually enter the needed details. This way, you’ll need to hold your iPhone over the card – like you’re taking a photo. Please note that the photo-detection process doesn’t work with cards that have flat numbers. Instead, these need to be embossed since this is the only way for your iPhone to recognize the numbers and needed information.
Apple Watch: It is interesting to note that even if you are already using Apple Pay on your iPhone, you still need to add your cards to your Apple Watch. The reason for this is because Apple’s smartwatch comes with its own Secure Element, which we told you about earlier. Even though this can be a hassle, this is actually a good thing since this shows that your private information isn’t being transmitted to Apple or third parties.
To set up Apple Pay on your Apple Watch, you need to use the Apple Watch app on your iPhone. Open the My Watch tab and navigate to “Wallet & Apple Pay”. This is where you can choose to mirror the alerts that show on your iPhone. You will also need to add payment cards, which can be done by using the smartphone’s camera to capture the data. The final step is to verify the information, just like we talked about earlier.
MacOS: In case you haven’t heard, Apple’s new MacBook Pro comes with the Touch Bar which contains Touch ID. What this means is that you can also use your Mac to pay for products online using Apple’s own payment system. The first step is to go to System Preferences > Wallet & Apple Pay, where you need to click on the Add Card buttons. This process is pretty much the same as on iOS devices, where you need to enter details and verify the payment card. However, you also need to add your fingerprint which is an additional security measure. Go to System Preferences > Touch ID, and click on Add a fingerprint. This will open a setup assistant which will guide you through the process of scanning your fingerprint. Once this is done, you can use your fingerprint to authenticate your Apple Pay purchases.
You also need to know that Apple Pay is currently compatible with Safari only. If you’re using Chrome, Firefox or some other web browser, you won’t be able to use Apple Pay. On top of that, not all e-commerce stores accept Apple Pay, even though this list is growing every single day.
Authorization: After having added a new payment card to the Wallet app, you will need to authorize the card in order for Apple Pay to use it. Note that different banks have different authorization procedures. For example, Capital One doesn’t require this step since this bank automatically adds and activates your Apple Pay system. However, Citibank and American Express require an activation code. Still, this happens automatically and you should receive a call, email, or text using the number you have on file.
Managing Your Cards: To simplify your payments, it is a good idea to have one default card. In case you add more than one payment card, you will have several ways to pay for something. Still, having one default card makes this process much faster and simpler. To do this, you need to launch the Settings app on your iPhone or iPad. Look for “Wallet & Apple Pay” in the main menu. Now tap on “Default Card”, which will take you to a new panel that will allow you to pick your default card. Once you do this, the selected card will always be used first when you initiate Apple Pay payment.
Removing a Card: In case you lose, cancel, or charge your payment card, you’ll need to remove it from Apple Pay. To do this, launch the Settings app and tap on “Wallet & Apple Pay”. This will open a new panel where you’ll see all your payment cards. Tap on the one you’d like to delete, and finally tap on “Remove Card”, located at the bottom of the screen. Note that the payment card you deleted won’t be available via Apple Pay on that particular device. Since this service works on a per device basis, you will need to remove that card from every device it’s linked to individually.
Troubleshooting: In most cases, you shouldn’t experience any problems when adding a new payment card to the Wallet app. However, don’t be surprised if you fail to go through the setup process if Apple Pay just recently expanded to your country. In case this happens, wait for a couple of days and then re-try to add your payment cards. On the other hand, if you fail to receive the verification code needed for Apple Pay to work, you will need to manually retrieve it by calling your bank’s call center.
How to use Apple Pay?
Pay in stores: As you probably know by now, you can use Apple Pay to pay in stores that accept contactless payment. To make this process easier, our advice is to check whether your preferred card is your default Apple Pay card.
In order to pay for something in-store, you’ll need to rest your finger on Touch ID and hold your iPhone within an inch of the contactless reader until you see “Done” and a checkmark on the device’s screen. You can also use Apple Watch to pay for something by double-clicking the side button and holding the display of your Watch within an inch of the contactless reader. Wait until your feel a gentle tap on your wrist which notifies you that the payment is complete.
In case you don’t have a default payment card, or if you’d like to pay using a different Apple Pay method, you need to hold your device near the reader without resting your finger on Touch ID. This is when you’ll see a list of previously entered cards that are ready for use. Simply tap the one that you want to use and place your finger over the fingerprint reader to finalize the payment. This can be done on your Apple Watch as well by double-clicking the side button. You should see a list of available payment cards, where you can swipe left or right to browse. Once you pick the right one, hold your watch near the contactless reader to pay.

Pay within applications: Aside from using Apple’s payment system in stores, you can also use it to pay within applications and websites. However, you need to look for the service’s logo which means that certain application or website supports this kind of payment. To initiate the process, click on “Buy with Apple Pay” or “Apple Pay”. First, make sure that you’ve correctly filled fields like billing, shipping, and contact information. In case this is your first purchase, you’ll probably need to enter this data manually. Luckily, Apple Pay will remember this information, making it easier to use the service in the future. Once you’re ready to finalize your payment, your iPhone will ask you to authenticate the purchase by using Touch ID. Just like with in-store shopping, you’ll be notified when your payment is complete.
Use Apple Pay on MacOS: As we previously told you, the newest MacOS version brought Apple Pay to Macs. You already know how to initiate and set up this payment service, so now we’ll see how you can use it to pay for things online. Please note that Apple Pay currently works only within Safari.
In case you have the newest MacBook Pro that comes with the Touch Bar and Touch ID, you can use your computer to purchase something and authenticate that purchase. Just like on iOS, make sure that your information is correct like shipping, billing, and contact info. Once you’re ready to checkout, make your purchase. The Touch Bar will show a message asking you to place your finger on Touch ID. The process is done once you successfully authenticate the transaction.
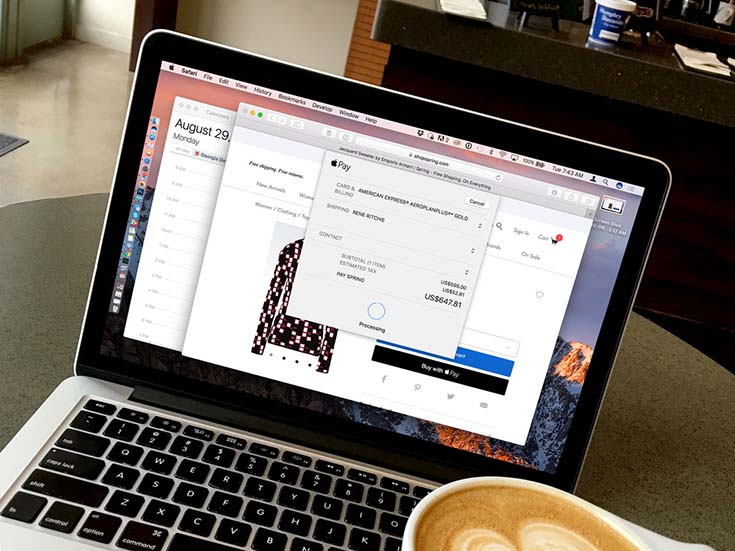
You can use this payment method even if you don’t have the new MacBook Pro. This is because your Apple Pay transaction can be authenticated via your iPhone and its Touch ID sensor. This process is not that different that shopping on your iPhone. You need to make sure that your information is correct, and then you’ll see a message on your iPhone asking you to provide your fingerprint. Please note that you need to use the same Apple ID on your Mac and your iPhone, at the same time.
How to use the Wallet app?
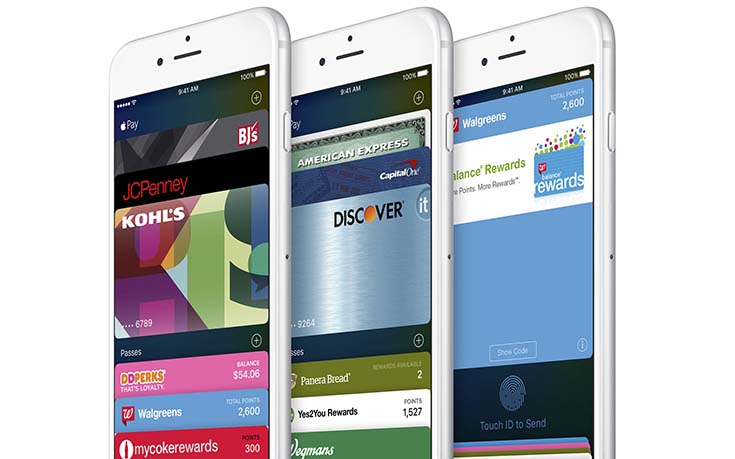
Once you start using Apple Pay and the Wallet app, you will discover that this application can be quite helpful. This app doesn’t only allow you to pay for things in stores and online, but can also help you by eliminating physical cards from your wallet. This is because the Wallet app stores your passes, tickets, coupons, credit and debit cards, as well as loyalty cards. Furthermore, the app is location aware and always online, which if why you can use it update the balance on your cards or gate number on your boarding pass.
Let’s take a look at how you can add, refresh, and reorder cards, as well as a few other interesting tips and tricks.
Add a Card: Once you discover that your favorite store or movie theater accept digital cards, there’s no reason not to add your loyalty cards to the Wallet app. However, what you need to know is that you need to use a third-party application to add Wallet cards to this app. So, let’s say that you have a Starbucks loyalty card, which means that you’ll need to download the Starbucks app to your iOS device. From within that app, you need to locate the “Add to Wallet” option, where an older application might mention “Passbook” instead of “Wallet” – which is this app’s old name. Once you find this option, which is usually located around your personal account info (especially if you already use a digital loyalty card that stored within a third-party app) you can easily transfer it to Wallet.
It is also worth knowing that you can add your Apple ID as well, which gives you an easy way to keep track of this card. To do this, you have to add your iTunes Pass to Wallet and this is done by visiting the iTunes Store app. Scroll all the way down to the bottom of the page and tap your Apple ID. Now choose to View Apple ID. After typing in your password, you should see a list of different sections, and you need to find the iTunes Pass section, with the option to “Add iTunes Pass to Wallet”.
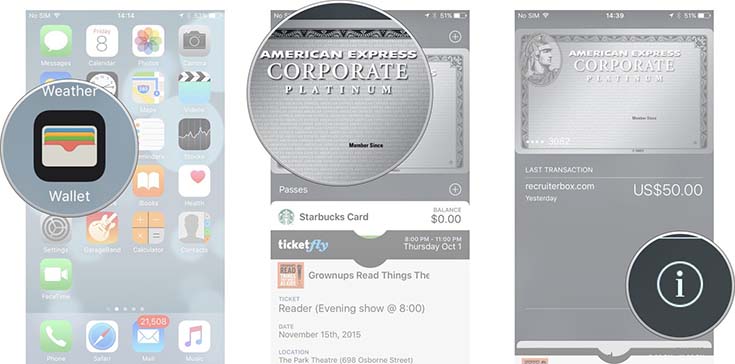
Refresh a Card: One of the best things about the Wallet app is that it’s online at all times and has the ability to automatically update your cards and show you the current balance. Still, you might find yourself in a situation with a poor Internet connection. This is why you’ll be glad to hear that you can refresh your cards manually, or differently said – you can force the app to refresh the balance of your cards. Do this do, visit the Wallet app and tap on the card you’d like to refresh. Now look for the Info button, located in the bottom right-hand corner. Tap and hold your finger anywhere near the top of the card, and finally pull from the top of the card and release in order to refresh.
Reorder Cards: We all organize different cards in our wallets in a different manner. However, many of us tend to place those often-used cards on top of the other ones, so there’s no reason not to do that within the Wallet app as well. This can save you same time when you need to use a certain payment or loyalty card. To reorder your cards, open the Wallet app first. Now, you need to press and hold the card you’d like to move. You’ll see an animation showing you that can you move that card and reorder things in the Wallet app. Simply drag it to the position you want it and release it. That’s all!
Share a Card: Yes, you can also share a card using one of the several available methods. From within the Wallet app, tap the card you’d like to share with someone (or with your other iOS devices). Now find the Info button, located in the right-hand corner of the pass. Finally, click the “Share Pass” button. You will see a list of available ways that you can use to share the pass like email, message, AirDrop, as well as other third-party applications or extensions that support Wallet.
Remove a Card: When you’re finished using a pass or card, you can remove it from the Wallet app. To do this, find the card you’d like to delete and tap on it. Now locate the info button in the bottom right-hand corner to flip the card over. Finally, tap on “Remove Pass” and confirm your decision.
Automatic Updates: As we said earlier, the Wallet app uses your Internet connection to update your cards and tickets. If you don’t need this feature, or if you’d like to update your cards manually, you can disable it. From within the Wallet app, find the card you’d like to turn automatic updates ON or OFF. As you can see, this can be done on per card basis, which means that you can’t disable the whole app from accessing the Internet. Once you find and “open” the card, tap on the info button in the lower right-hand corner. Now adjust the Automatic Updates slider by moving it right to turn on updates, and left to turn them off.

Customize the lock screen: By default, the Wallet app shows lock screen notifications to let you know about relevant passes. Even though many of us like this feature, this isn’t exactly the best option when it comes to privacy and security. That is why we are going to show you how to turn off lock screen access for Wallet. First, navigate to the Settings app from the Home screen of your iPhone. Tap on Wallet & Apple Pay, and find the “Double-Click Home Button Slider”. Move this option’s switch to the left to disable access to all cards in Wallet from your Lock screen.
Location access: Yes, you can also disable Wallet from accessing your location. Still, you need to know that this option is used by the app to notify you when you arrive that your favorite coffee shop, for example, so you can use Apple Pay or Wallet. Some people really care about their privacy and the data they transmit to Apple, so we’ll show you how to disable this option.
Head over to the Settings app and tap on Privacy. Now find the Location Services option. You should see a list of all your installed iOS applications, so you’ll need to find the Wallet app. Click on this app’s name and tap on “Never” to disable the app from accessing your location.
Tips and Tricks
Manage your shipping address: If you decide to use Apple Pay on a regular basis as your go-to payment method, there’s no reason not to fine-tune it. This also applies to adding your preferred shipping address, which can be done by visiting the Settings app. Under “Wallet & Apple Pay” you will see an option called “Shipping Address”. As you’ll see, this is where you can add more than one address, and even make one of those your default one. This way, your default shipping address will appear every time you decide to buy something, with your additional addresses ready to be used as well.
View your recent transactions: Every serious budgeting or banking app offers a way for you to review your transactions. Apple Pay is no different. You can use the Wallet app for this functionality to view your recent transactions, and a longer transactional history in Settings (in case your credit card and bank support this option).
Head over to the Wallet app and launch it. Tap on the card you’d like to check out, and you should see a list of any recent transactions. If you tap the Info button in the bottom right corner, you can see even more transaction. This is a helpful and easy way to review your financial activity.
In case you need to view a detailed history, head over to the Settings app. Once again, tap on “Wallet & Apple Pay”. Now tap on the payment card that you want to review, and finally tap on “Transactions”. In case your bank has an iOS app, you will be able to see the option to open that app can view complete account details.
Get a refund: You will be happy to know that if you want to return your purchase and get a refund, you can count on Apple Pay. To start this, you need to provide the merchant your receipt so they can initiate this process. When asked, you will need to position your iPhone over the contactless terminal, which is when you will see a message from Apple Pay. Simply authenticate the transaction and you are done.
At times, the merchant will need your Device Account Number to find the transaction and annul it. In that case, open the Wallet app and pick the card you originally paid with. Now tap on the Info button in the lower right-hand corner. Toward the bottom of the menu, you’ll see a number that represents your Device Account Number. Provide the cashier the last four digits which should do the job.
Disable Apple Pay remotely: Even though you don’t have to be afraid if someone who had stolen your iPhone will use Apple Pay to get to your money, there is one additional way to remotely disable Apple Pay. Thanks to iCloud, you can use a web browser to log into this system and remove your payment cards from your Apple Pay account. However, what you need to know is that you need to enable the “Find My iPhone” option on your iPhone first. This is done by visiting the Settings app > iCloud > Find My iPhone. Simply flip the switch to ON and you’re ready to go. Here, you’ll also see the option for your iPhone to send its last known location when your device is about to turn off due to low battery. This can be a very handy option, so make sure you enable it as well. Now, to disable Apple Pay remotely, you need to log in to iCloud.com and navigate to the My Devices section. This is where you’ll see a list of your mobile devices as well as your notebooks and desktops. You’ll also see the Apple Pay logo next to those devices that have credit cards associated with them. Select a device that you’d like to remove and make sure you include your credit cards and Apple Pay as well. Click on “Remove All” and you’re done. As said previously, Apple Pay requires your fingerprint to finalize payments, so you should be safe even if you don’t disable the service remotely. Still, this piece of advice can be handy at times.
Donate to charities: Even though Apple previously banned iOS applications from collecting money for charities and fundraisers, today you can use Apple Pay to donate funds. This is done in the exact same manner as paying for something that you purchased online. What this means is that you’ll have to find the “Apple Pay” button within applications or websites and use that button to send money via Apple Pay. Some of the nonprofits that support this option are American Red Cross, American Heart Association, Feeding America, UNICEF, WWF, in addition to American Cancer Society, United Way, and many others. Aside from the United States, users from the United Kingdom can also use this option. Apple has partnered with 22 UK nonprofit organizations to allow iOS users to make donations using the company’s payment system.
Where is Apple Pay accepted?
Regardless of if you want to keep track of places that accept Apple Pay or if you’re new to this service and want to try it out, you’ll be happy to hear that a lot of retailers have decided to support this technology.
A couple of months ago, Apple announced that 35 percent of US merchants now accept Apple Pay. This is quite astonishing, especially if we say that in the span of four years, the company managed to move from 4 up to 35 percent of retailers who support this service. This is over 4 million stores, which means that you are already able to use this payment method in a store near you.
Now, let’s take a look at how you can figure out who accepts Apple Pay while on the go. Perhaps the easiest way is to look for one of the symbols displayed underneath this paragraph. Apple is working had to persuade merchants and retailers to adopt this technology, and they are more than willing to show that you can use Apple Pay is their stores. You can also ask business owners or employees. Even if they never heard of this technology, you’re helping to build awareness.

It’s is also a good idea to figure out who accepts Apple Pay ahead of time, so you can be prepared. To do this, visit Apple’s own web page which lists major brands and retailers in the US. Aside from seeing stores where you can use this system, you’ll also get to see online e-commerce stores that accept Apple Pay, making it easier for you to shop online.
It is also worth knowing that companies like Comcast are correct introducing an option where you can use Apple Pay to pay your monthly bills so you don’t have to send checks by mail or manually enter card information. This feature is currently rolling out to select users of the Xfinity My Account iOS app but should be available for all users in the next couple of months.
Another way to use Apple Pay is to send money directly to someone, even though this will be available this Fall. Announced at the recently held Worldwide Developer’s Conference, Apple Pay is finally getting person-to-person money transfer. However, this might not be as intuitive as we’d like it to be. What we currently know is that this feature will live inside the iMessage app, as well as that the money will be transferred to something called an “Apple Pay Cash Card”, which can be then sent to your bank account. Even though this certainly doesn’t threaten PayPal and other similar payment systems, this is a very interesting first step and we can’t wait to discover more.
Conclusion
We hope that we helped you learn all you need to know about Apple Pay. As you can see, Apple has done a good job of creating and easy-to-use payment method that is also really safe and secure. This technology is not in its early days, so you don’t have to be worried about fraud or what will happen is someone steals your iOS device. Even if that happens, we told you how you can use iCloud to access your device remotely and wipe out your Apple Pay data.
Aside from learning the basics and some advanced things you can do with Apple Pay, we also presented you a short guide on how to use the Wallet app. People are usually confused about the difference between Wallet and Apple Pay, so we hope that now you are capable of explaining how these two applications work on their own. There is no reason not to use the Wallet app since it can help you eliminate plastic cards and passes from your wallet. Take your time to really dig into this app, and you won’t regret it.

